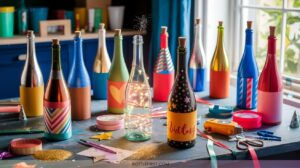
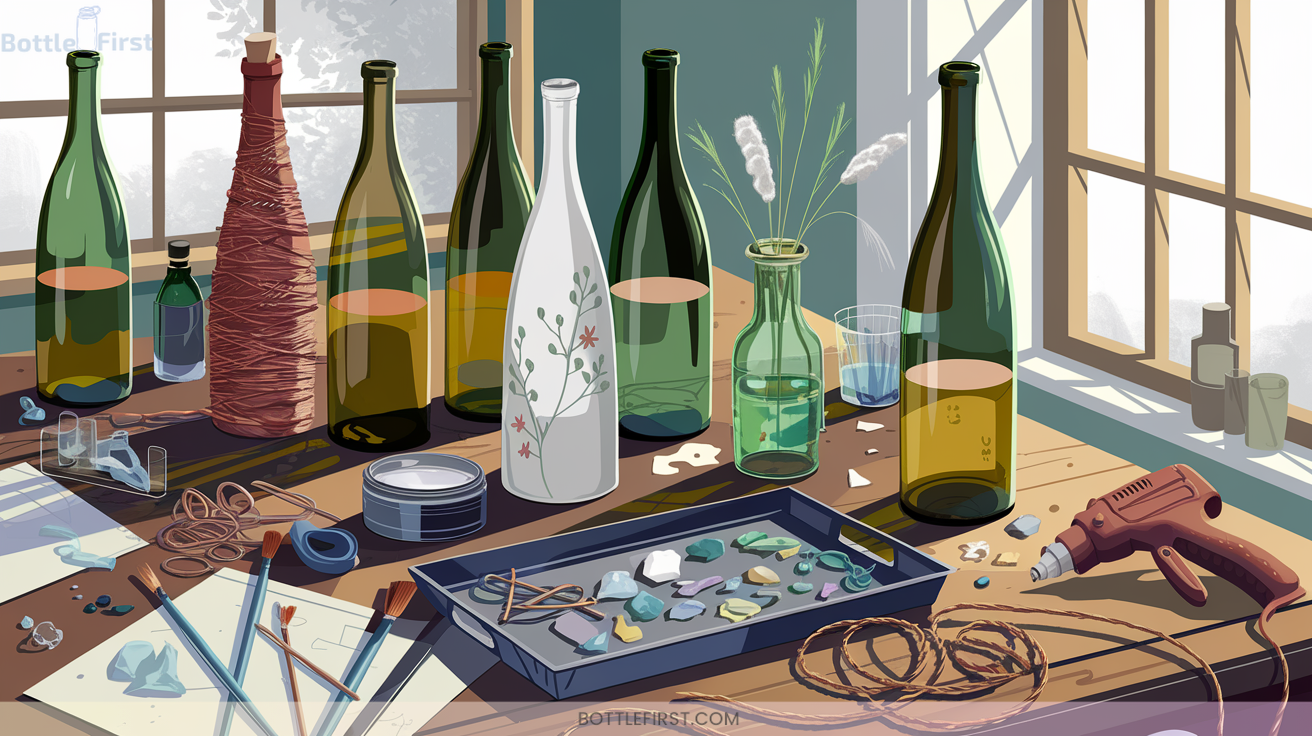
25 Elegant Glass Wine Bottle Crafts Ideas for Sophisticated Entertaining
Transform ordinary glass wine bottles into sophisticated decorations with techniques like painting vases, creating ombre art, and adding metallic accents. Enhance them with stenciled patterns or etch personalized designs for chic detailing.
Upcycle into lamps or candle holders for stylish lighting, or craft versatile serving trays. Colored bottles with LED effects or terrarium displays add vibrant, trend-setting flair. Each craft offers an elegant twist for entertaining that beckons further discovery.

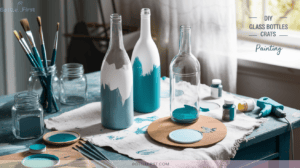
1. Painted Wine Bottle Vases
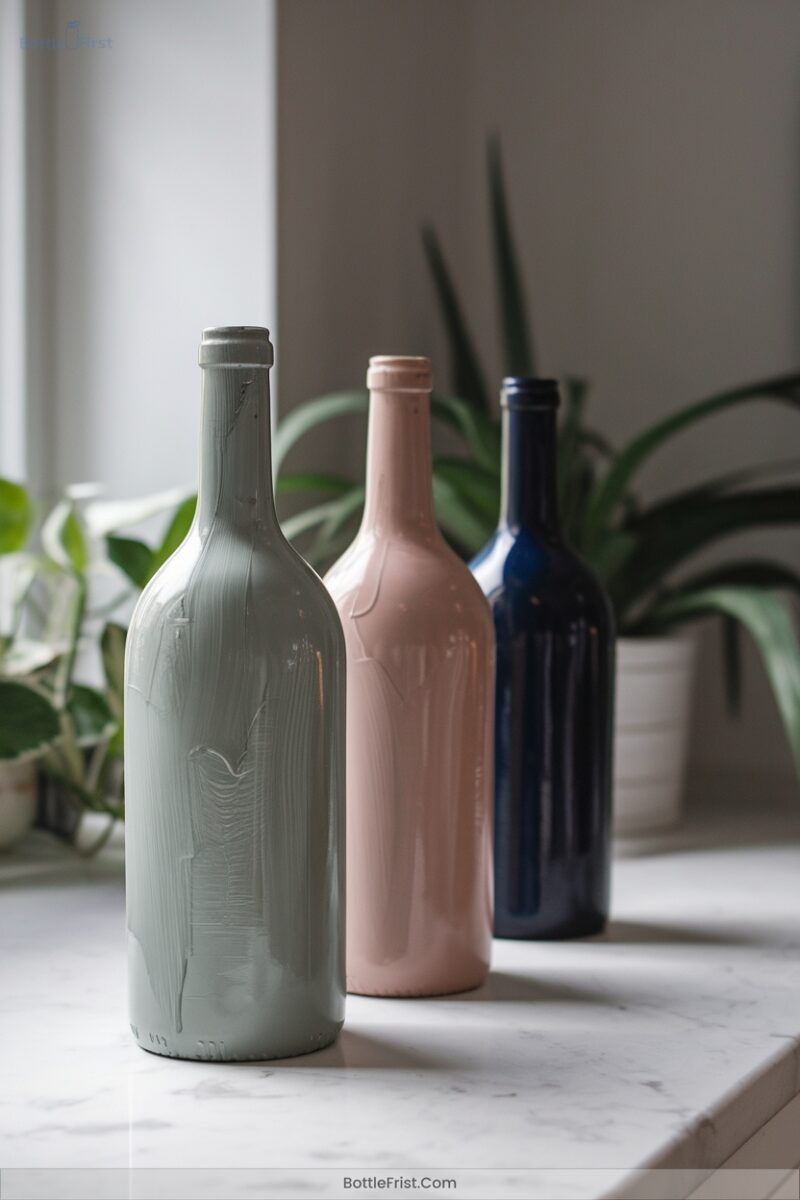
When transforming empty wine bottles into chic vases, starting with a great foundation is key.
Begin by thoroughly cleaning and drying your bottles. Remove labels with hot water and soap, then lightly sand the surface for better paint adhesion. Use a glass primer to guarantee your creative paint choices last.
Start with clean, dry bottles; remove labels, sand lightly, and apply primer for lasting paint adhesion.
Choose acrylic or chalk paints in on-trend colors; apply them with a foam brush or try spray painting for a smooth base. For unique textures, mix paint with sand or apply stencils for intricate designs.
Seal your masterpiece with a clear acrylic sealer, and voilà—your innovative vase is ready!
2. Ombre Wine Bottle Art
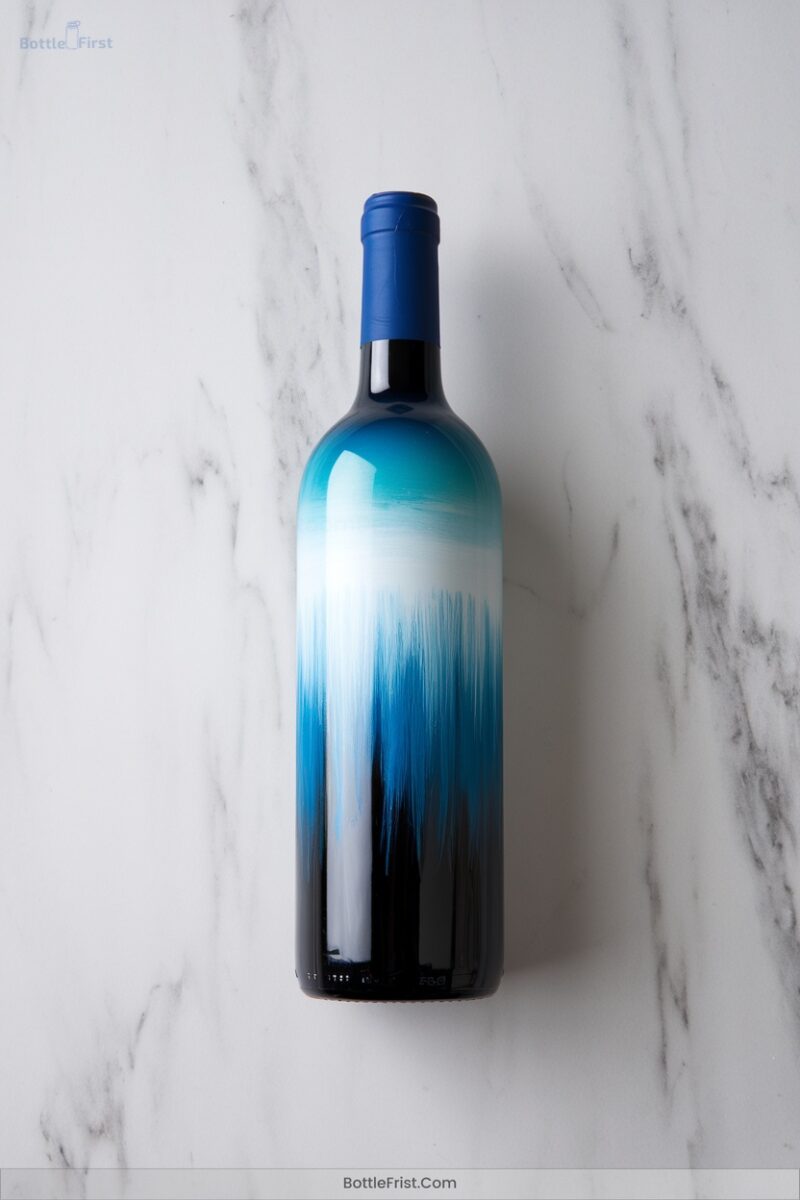
If you’re seeking a sophisticated way to elevate your home decor, ombre wine bottle art offers a modern twist that can’t be overlooked.
Begin by selecting three to four shades within the same color family. After removing labels, clean your bottles thoroughly.
Use spray paint for a crisp vertical or horizontal gradient, or opt for acrylics with a soft, blended finish. Painter’s tape guarantees clean lines, while a clear sealant adds durability.
Experiment with reverse ombre for a dramatic flair or add glitter for sparkle.
Whether bold or subtle, ombre bottles effortlessly transform any space into a chic, enchanting haven.
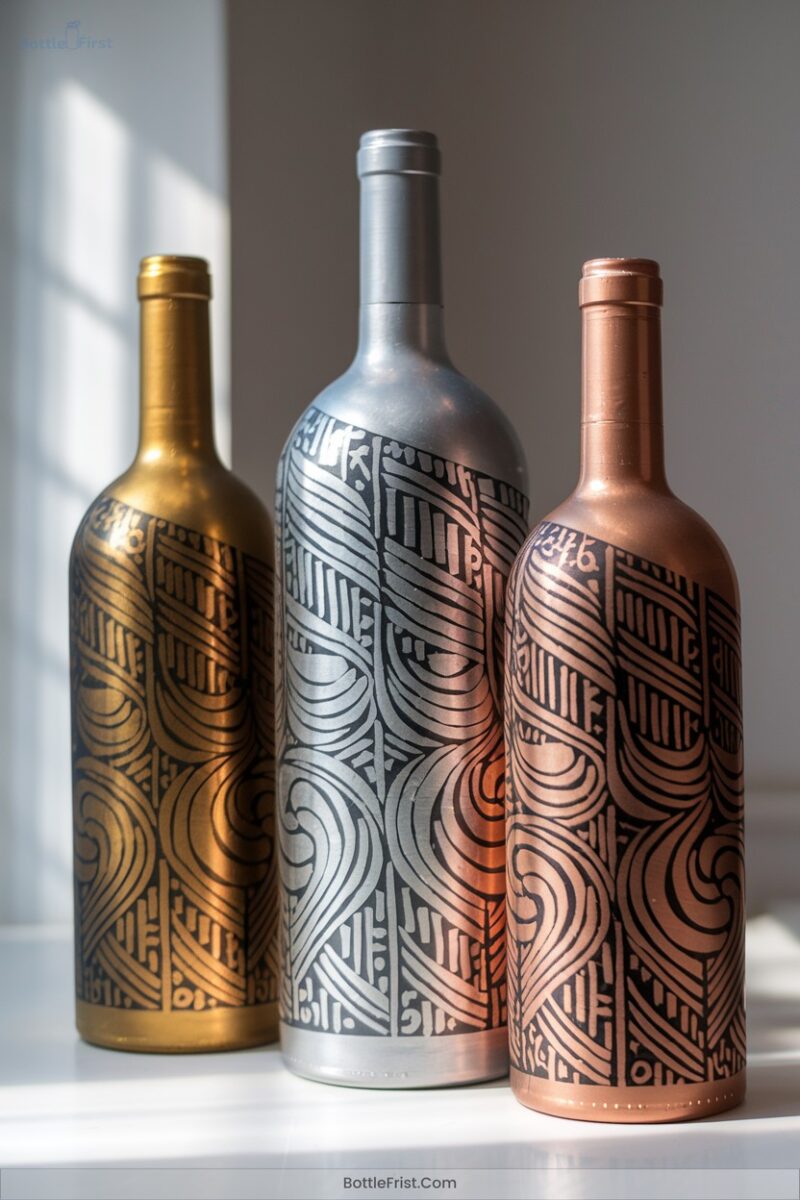
3. Metallic Accented Bottles

Transform ordinary glass into stunning metallic accented bottles that add a touch of glamour and sophistication to your decor.
Begin by mastering metallic spray painting techniques for a flawless finish. Prime your bottles and apply thin, even coats of spray paint, allowing ample drying time. For a luxurious twist, try gold leaf application. Clean bottles thoroughly, then gently apply gold sheets and seal with a clear spray.
Explore these ideas for unique accents:
- Use metallic paint pens for intricate designs.
- Rub-n-buff wax creates an antique effect.
- Adhere rhinestones with strong craft glue.
- Wrap bottle necks with metallic wire.
Embrace creativity and elevate your entertaining aesthetics.
4. Stenciled Bottle Patterns

Although glass bottles might seem ordinary at first glance, stenciled patterns can turn them into eye-catching decor pieces that enhance any setting.
Start by selecting adhesive vinyl stencils for crisp edges or reusable plastic ones for multiple uses. Custom-cut stencils offer personalization, while intricate designs suit smaller stencils best.
Secure the stencil firmly, apply thin paint layers using a sponge, and remove it while wet to prevent bleed. Experiment with glass enamel for permanency, or metallic paints for a touch of shimmer.
Add finishing touches like clear spray lacquer and decorative elements like twine or rhinestones for sophisticated flair.
5. Sealed Painted Bottle Designs
Release a world of creativity with sealed painted bottle designs that elevate glass bottles into stylish decor accents.
By mastering various techniques, you’ll transform ordinary bottles into artful masterpieces. Use multiple thin layers of acrylic paint for smooth, even coverage, enhancing them with metallic hues for a luxurious finish.
Transform ordinary bottles into artful masterpieces with thin layers of acrylic paint for smooth, luxurious finishes.
Experiment with marbling by swirling paints in water, then dipping bottles for an abstract touch, sealing with epoxy resin.
Etch intricate patterns using custom stencils and etching cream, combining painted accents for depth. Gilded accents with gold leaf add luxe metallic touches.
- Seal with clear acrylic spray
- Apply texture with sponges
- Create ombre gradients
- Use metallic paint pens
6. Wine Bottle Candle Holders
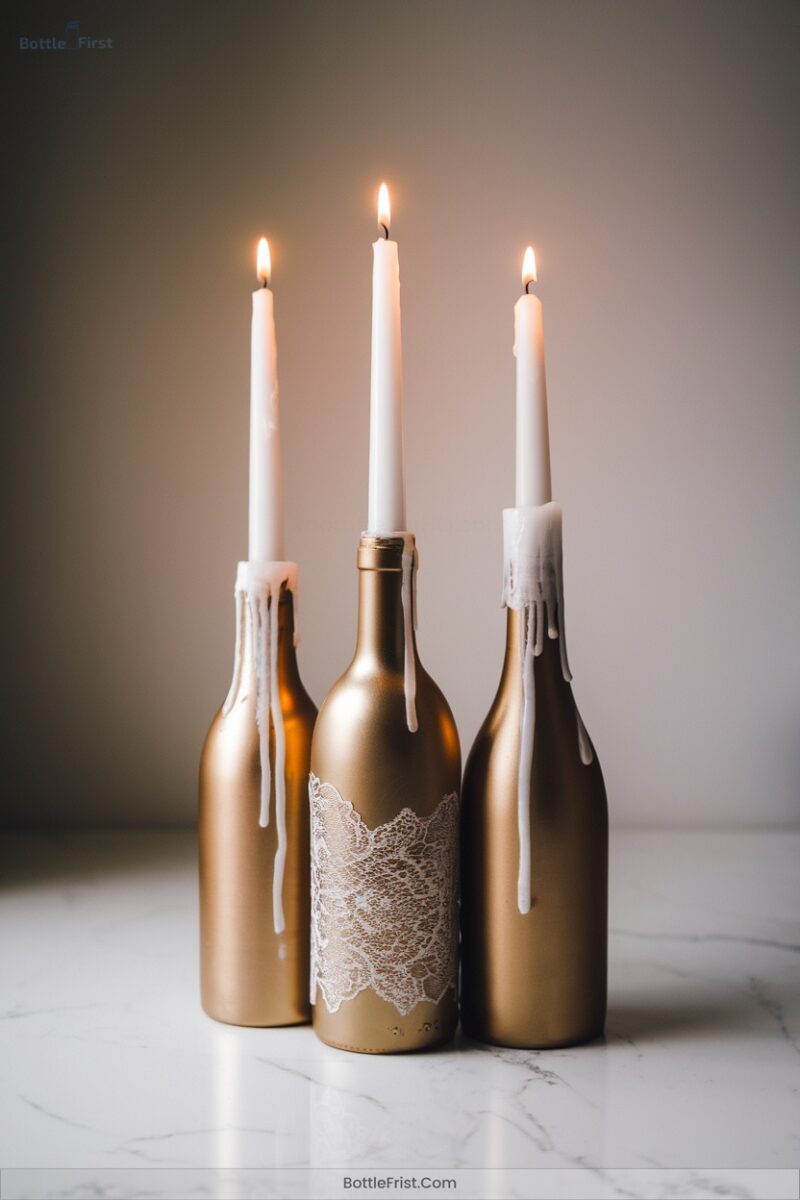
Harness your creativity by crafting wine bottle candle holders that illuminate your space with charm and style.
Start by gathering empty wine bottles, a bottle cutter, and sandpaper. Score the bottle with precision, applying alternating hot and cold water for a clean break. Sand the edges thoroughly, guaranteeing safety and polish.
Get inventive with designs—tiered holders, floating candles, or a sealing wax drip effect. Wrap jute or twine for a rustic touch, or paint for elegance.
Remember safety: wear gloves, use flameless candles, and ascertain stability. Add fillers like sand for weight and decoupage medium for decorative flair.
7. String and Acetone Cutting Technique
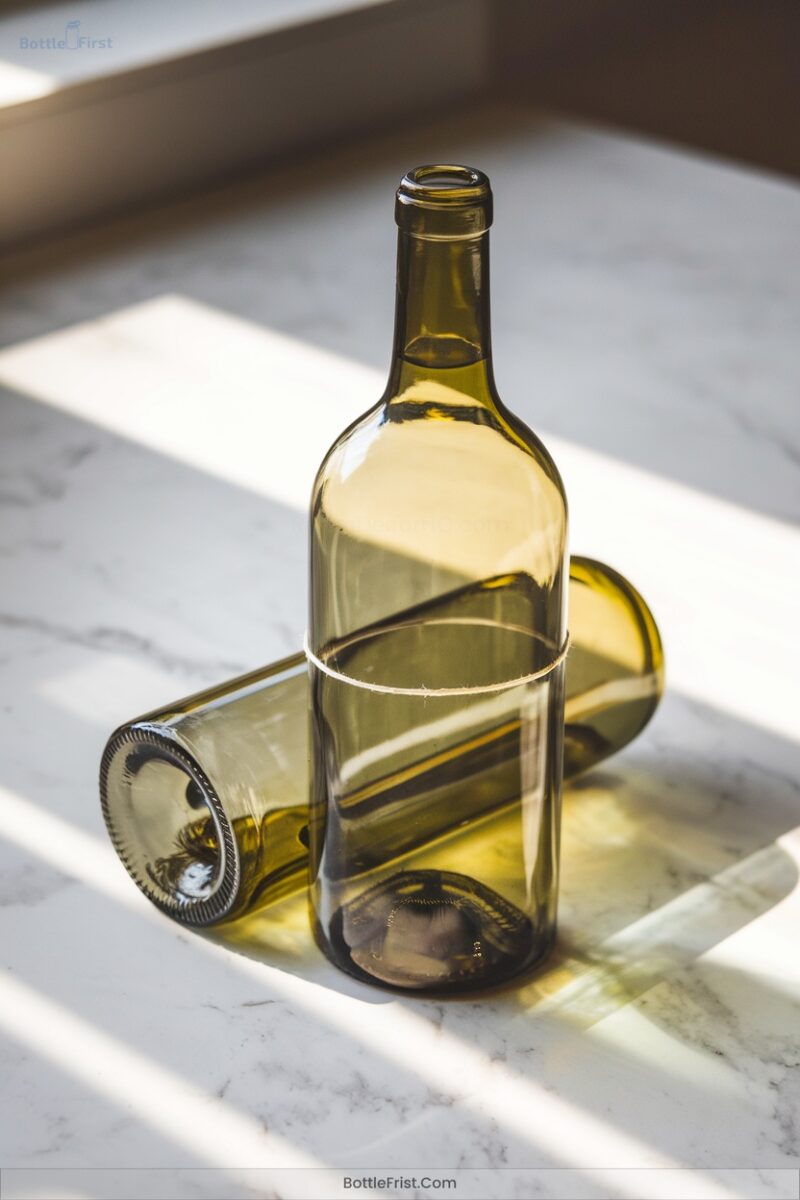
Many crafters are exploring the art of cutting glass with the string and acetone technique, a popular method for transforming ordinary wine bottles into extraordinary pieces.
Discover the creative world of glass cutting with the string and acetone method for unique wine bottle transformations.
You’ll need:
- An empty glass wine bottle
- Cotton string or yarn soaked in acetone
- A lighter and a bowl of cold water
- Safety gear like gloves and goggles
Wrap the string around the bottle at the desired cut line, light it, and rotate slowly.
Once the flame nearly extinguishes, submerge the bottle in cold water.
Listen for a crack, then separate the halves.
Sand the edges for a sleek, innovative finish.
8. Sanded Edge Candle Holders
Transform ordinary wine bottles into elegant sanded edge candle holders with just a few tools and techniques.
Begin by scoring the bottle’s circumference with a glass cutter. Use thermal shock—alternating heat and cold—to encourage a clean break.
Sand the edges starting with coarse grit, progressing to fine grit, guaranteeing smoothness with circular motions. Always wear protective gear and work in a ventilated area.
Polish the edges with a glass compound for a sleek finish. Clean with rubbing alcohol, and consider adding a frosted spray for a soft glow.
Test the candle fit to ascertain a stable, sophisticated centerpiece.
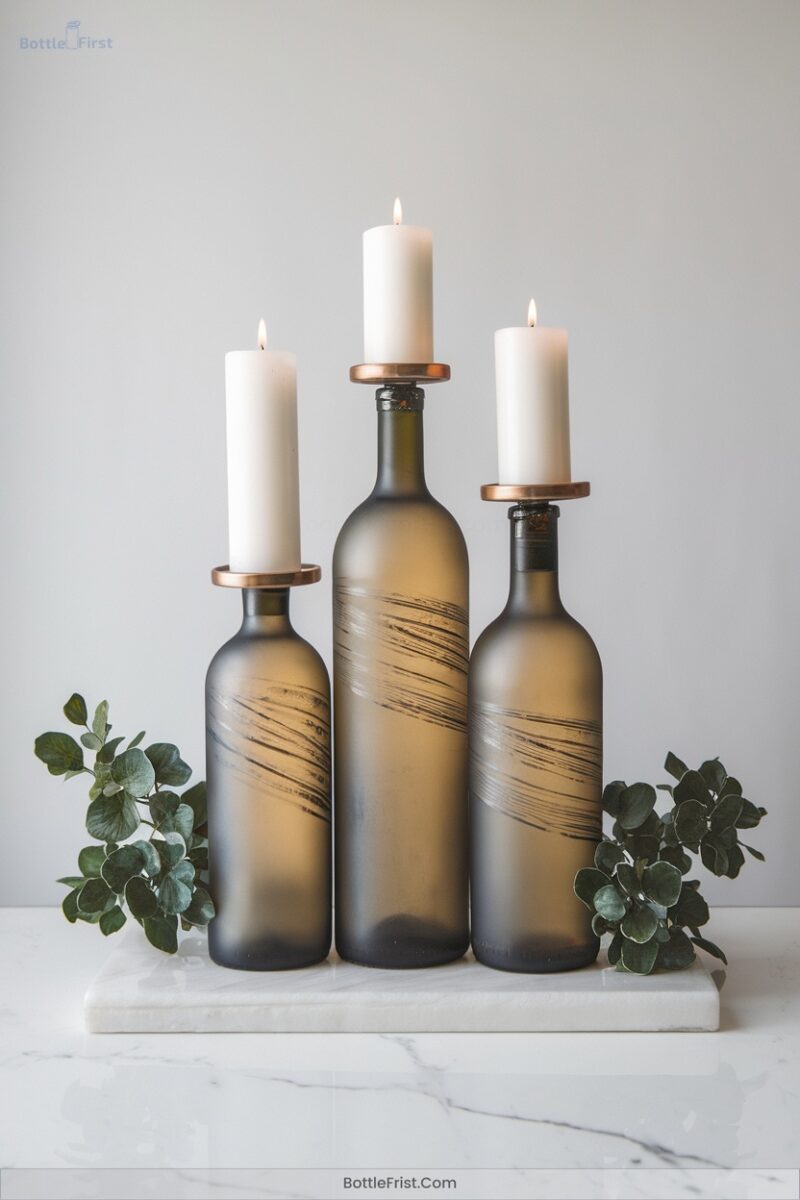
9. Clustered Candle Centerpieces
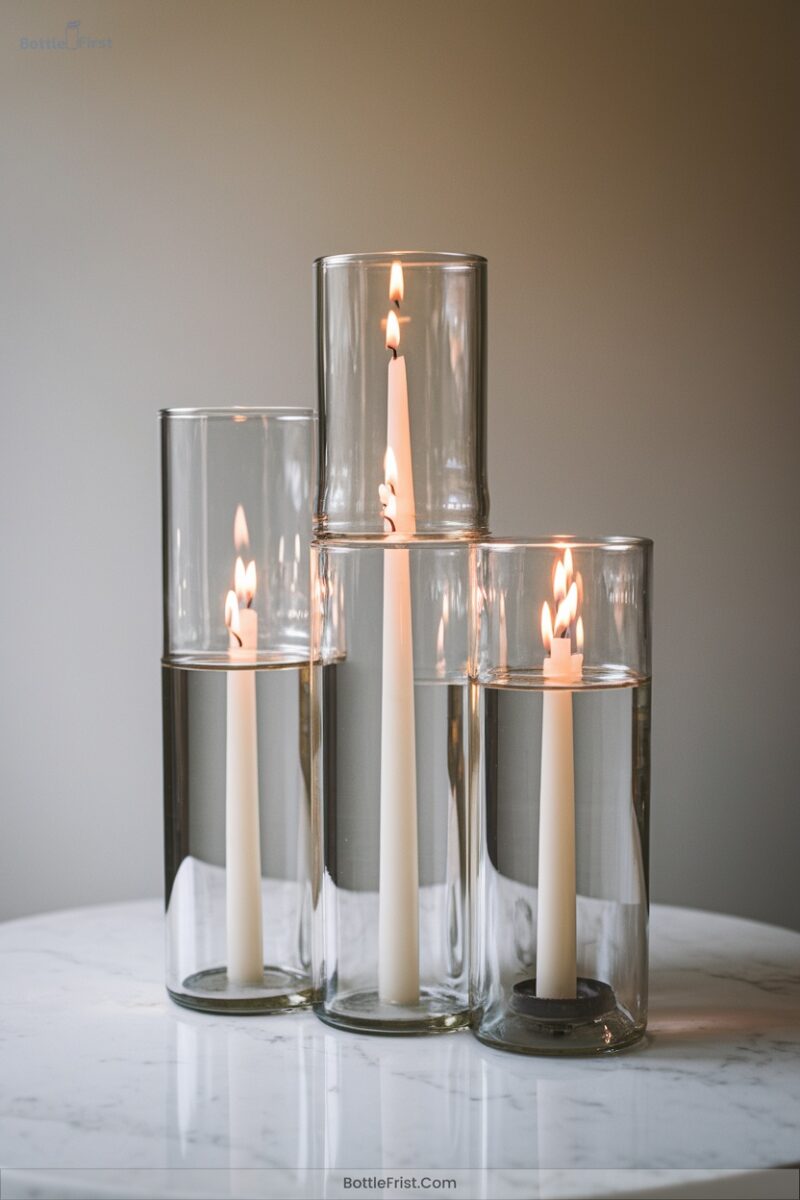
After crafting elegant sanded edge candle holders, you can further elevate your table setting with clustered candle centerpieces.
Group clear glass wine bottles in clusters of 3-5, using varying heights and shapes for visual intrigue. Fill them with water and floating candles, or insert taper candles for a warm glow.
Enhance your design with decorative embellishments like:
- Ribbon or twine wrapped around necks for a rustic touch.
- Greenery or flowers tucked between bottles for natural elegance.
- Mirrored trays to reflect light and create a dazzling effect.
- Colored glass using frosted spray or metallic paint for a trendy shimmer.
Explore these ideas to impress your guests!
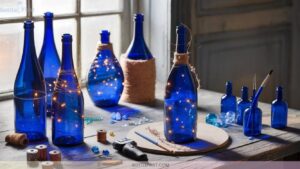
10. Hanging Wine Bottle Lights
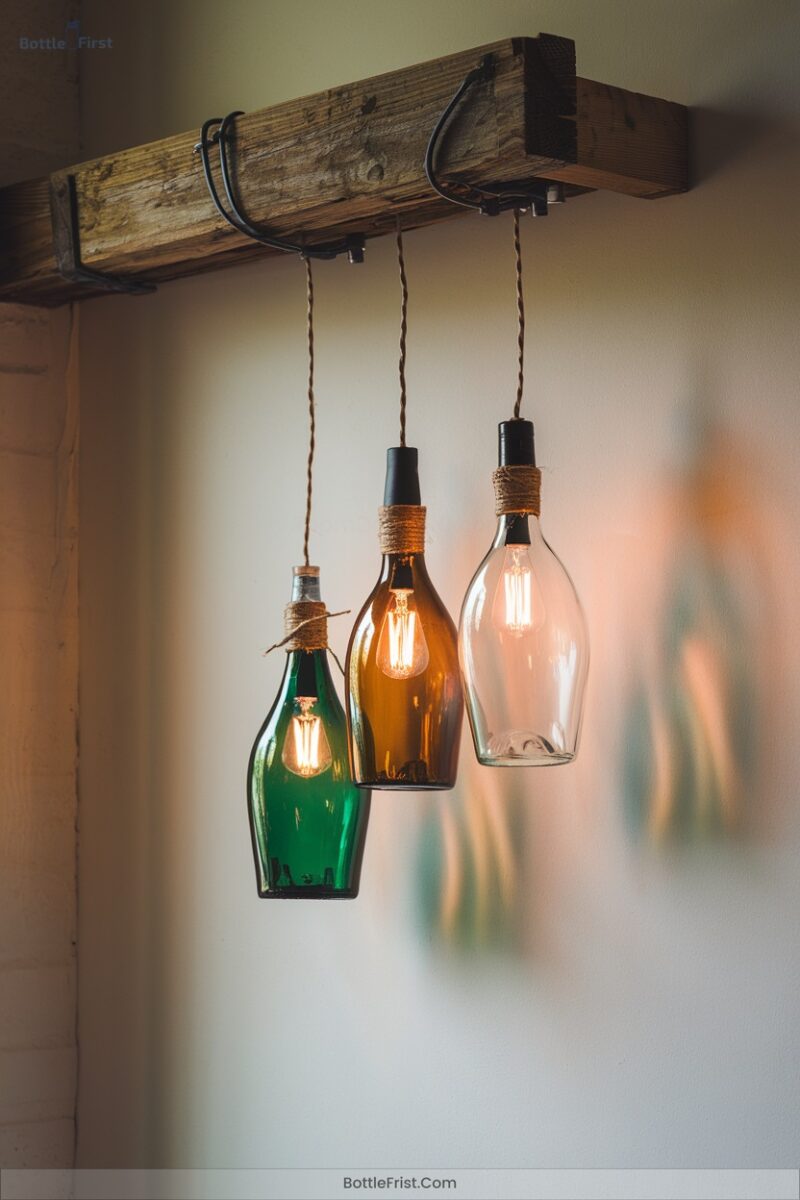
If you’re seeking a unique way to illuminate your space, consider crafting hanging wine bottle lights that blend elegance with functionality.
Start by gathering empty wine bottles, LED string lights, and essential hardware. Use a diamond-tipped drill bit to create a hole near the bottle’s base, smoothing edges and rinsing away dust.
Gather wine bottles, LED lights, and drill a base hole with a diamond-tipped bit, smoothing edges.
Feed LED strings through the neck, securing them with a cork. Innovate with bottle hanging clamps or wire wrapping, and suspend the lights from ceiling hooks or curtain rods.
For a chic touch, stagger bottle heights and group them in odd numbers. Incorporate colored glass for added flair.
11. Etched Glass Wine Bottle Decor
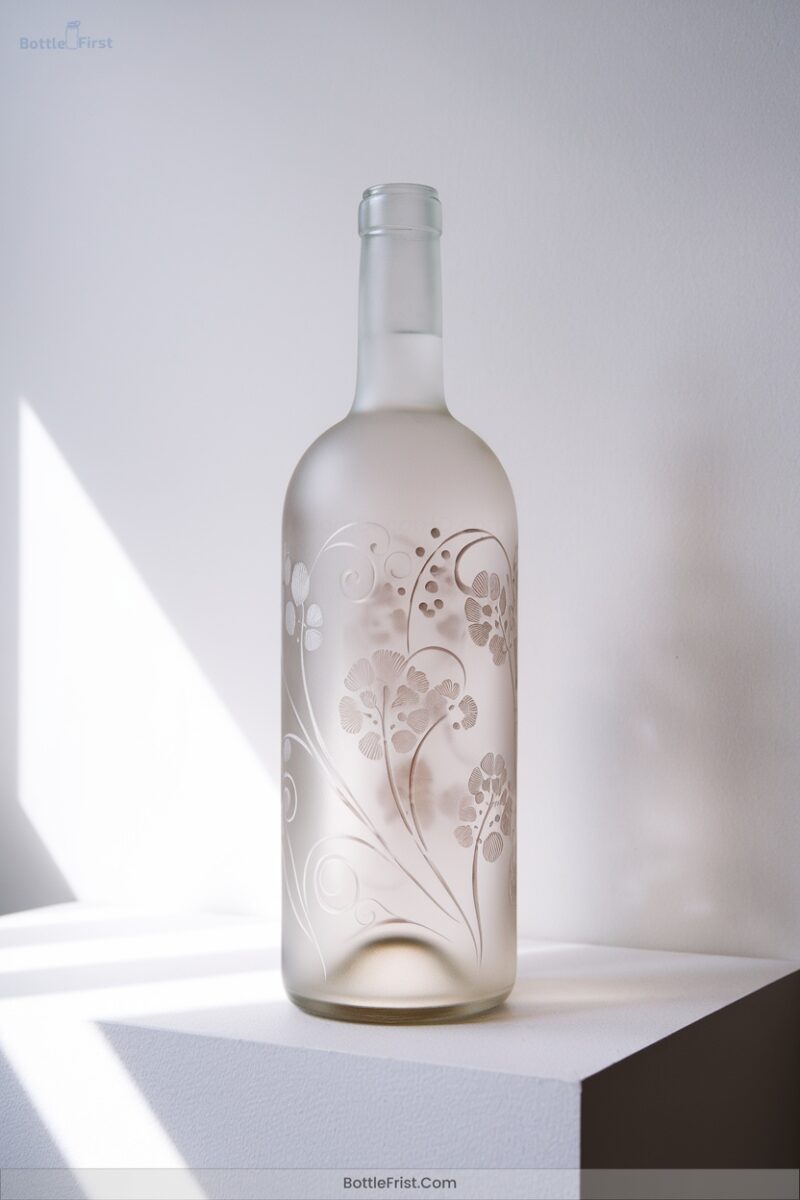
While etched glass wine bottle decor might seem intricate, it’s a rewarding craft that adds a bespoke touch to your living space.
Start by applying a vinyl stencil to a clean, dry bottle, then brush on etching cream. After letting it sit for 5-15 minutes, rinse thoroughly to reveal your design.
Get creative with:
- Monograms for personalization
- Intricate lace or floral patterns
- Geometric shapes and abstract designs
- Holiday-themed imagery
Experiment with techniques like reverse etching for a frosted look or layered etching for added texture.
Add twine or fairy lights for a sophisticated finish.
12. Vinyl Stencil Applications
When diving into the world of vinyl stencil applications, choosing the right type of vinyl can make all the difference in your crafting success.
Adhesive vinyl is perfect for flexible, disposable stencils, while permanent options guarantee long-lasting designs. For temporary flair, removable vinyl fits the bill. Specialty vinyls like glitter or holographic add a unique touch.
Begin by thoroughly cleaning your bottles and removing any residue. Use transfer tape and the hinge method for precise placement. Smooth out air bubbles and trim excess for a seamless look.
Experiment with layering, ombré effects, and typography to create stunning, sophisticated wine bottle crafts.
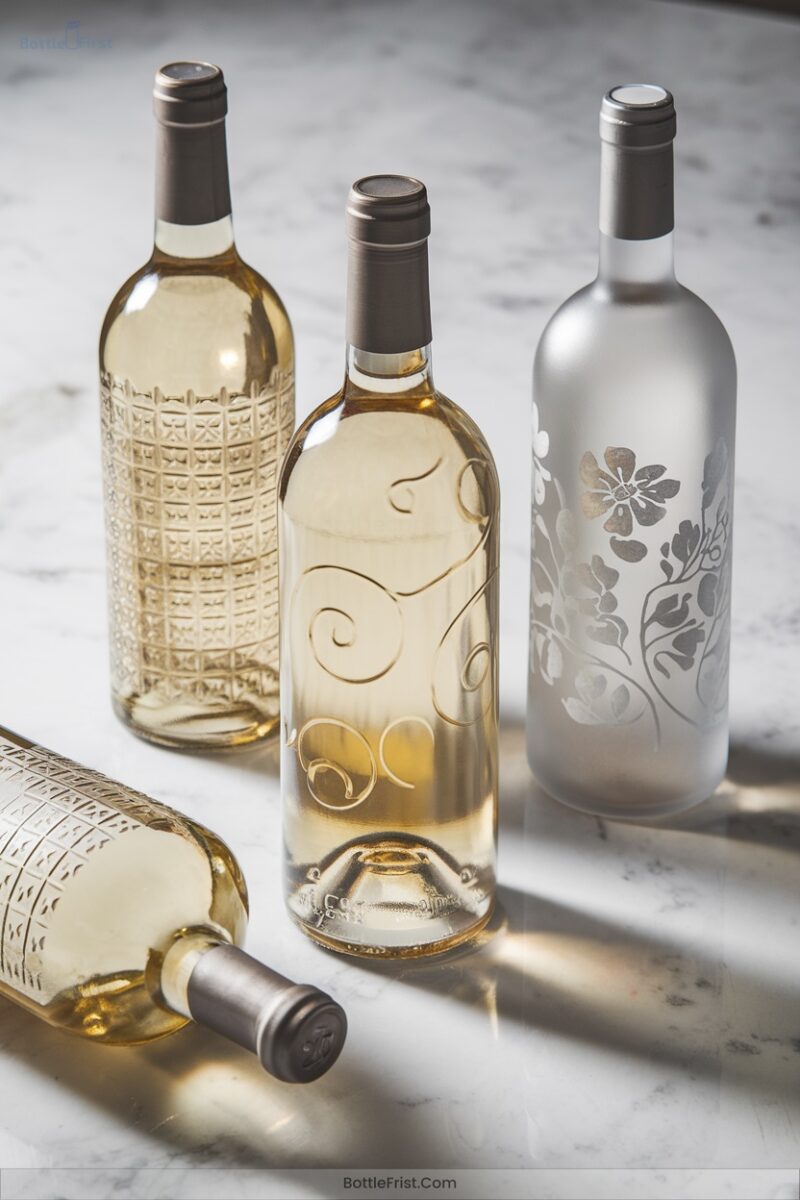
13. Frosted Pattern Creations
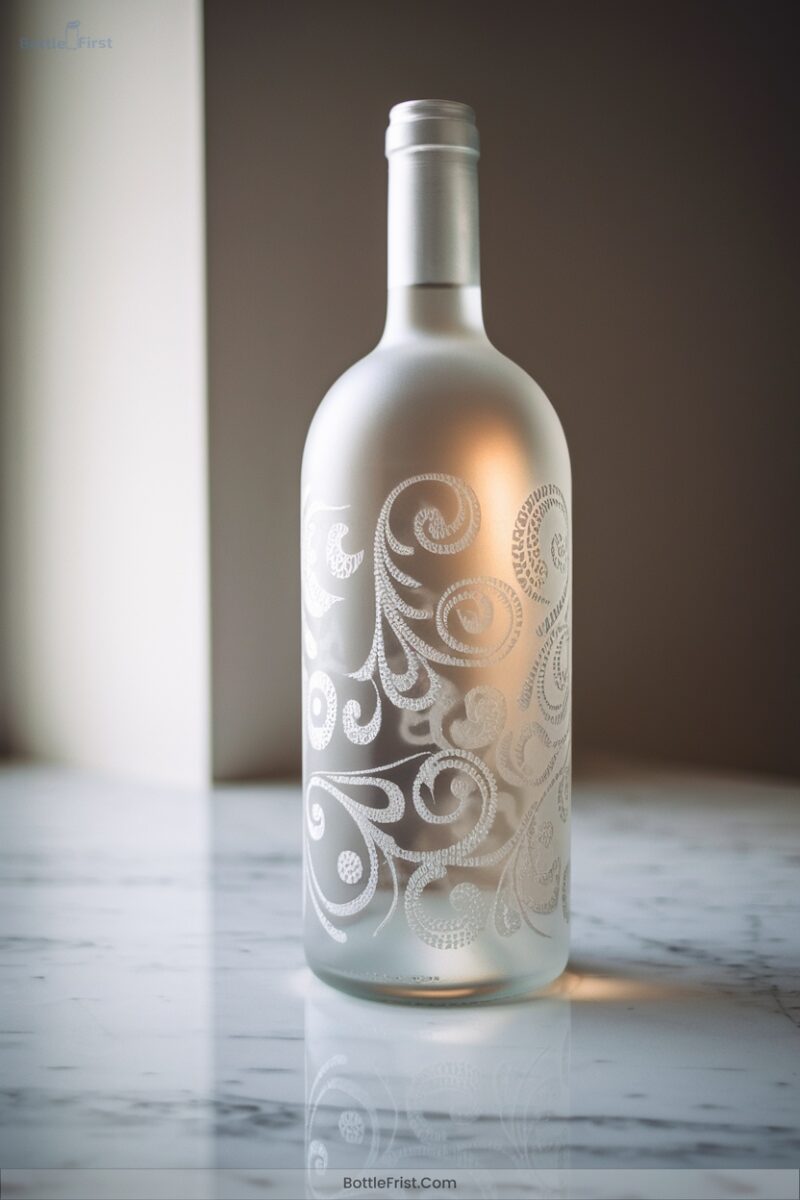
Embrace the art of frosted pattern creations to transform ordinary glass wine bottles into elegant, decorative pieces.
Begin with frosted spray paint techniques, using Rust-Oleum Specialty Frosted Glass spray paint for sleek lines. Apply painter’s tape and hold the spray can 10 inches away, layering light coats for a polished finish.
Use Rust-Oleum Frosted Glass spray paint and painter’s tape for sleek, polished glass bottle designs.
Epsom salt frosting delivers a snow-like allure—coat with Mod Podge, roll in salt, and seal with clear lacquer.
For an ombre effect, blend turquoise to white, using a sponge for smooth gradients.
Experiment with these methods:
- Frosted spray paint for crisp patterns
- Epsom salt for snowy textures
- Ombre gradients for color depth
- Beach glass look with textured finishes
14. Personalized Message Etchings
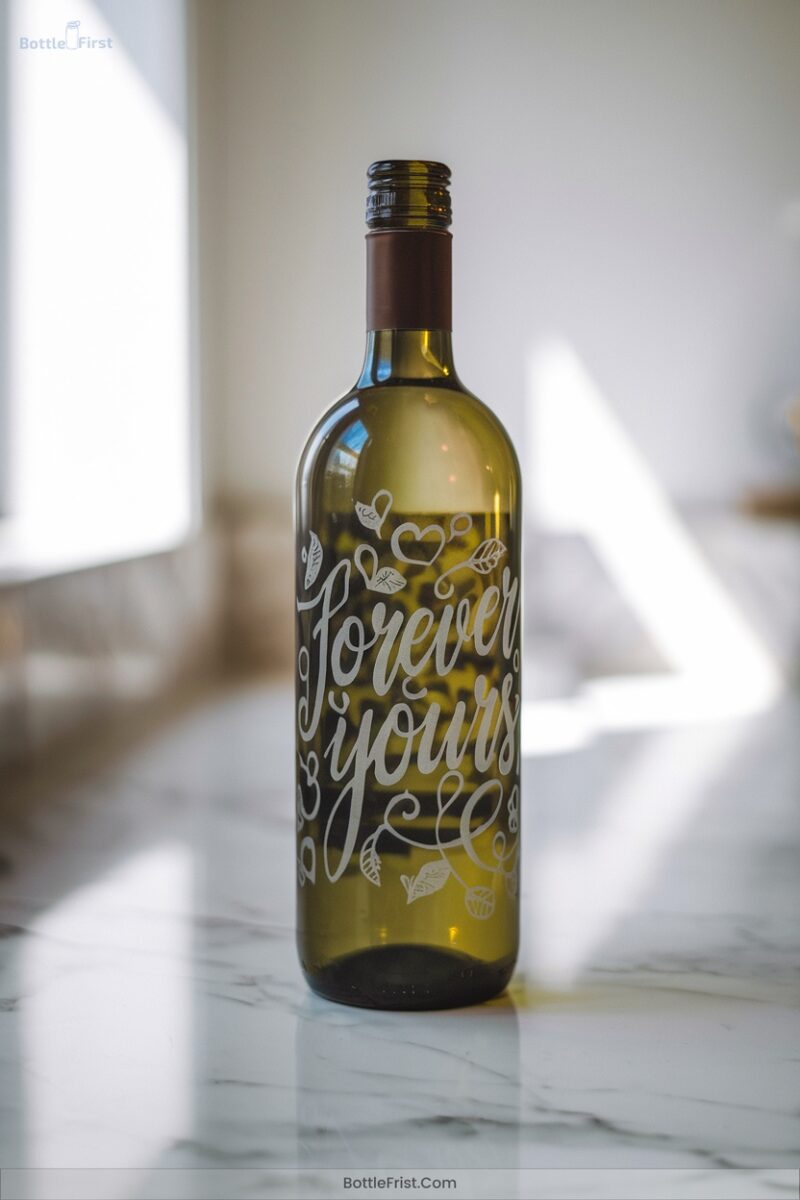
After mastering frosted pattern creations, add a personal touch to your glass wine bottle crafts with personalized message etchings.
Use glass etching cream for its accessibility or opt for laser etching for intricate precision. Celebrate milestones by engraving names, dates, or inspiring quotes. Script fonts add romance, while serif styles evoke formality.
For a unique twist, etch coordinates of cherished locations. Utilize vinyl stencils for clean transfers, and enhance designs with Rub ‘n Buff in gold or silver.
Before etching, preview your design digitally. Perfect for weddings, anniversaries, or corporate mementos, your bottles will become timeless keepsakes.
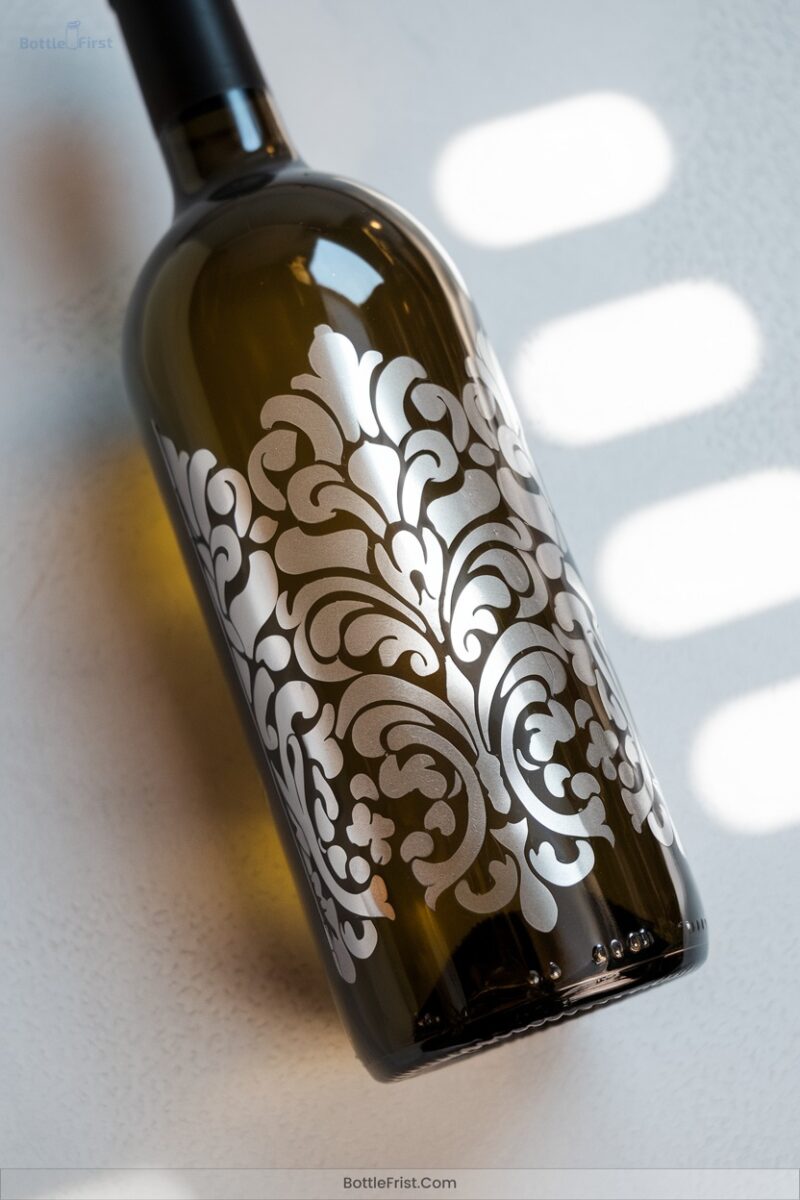
15. Intricate Design Etchings
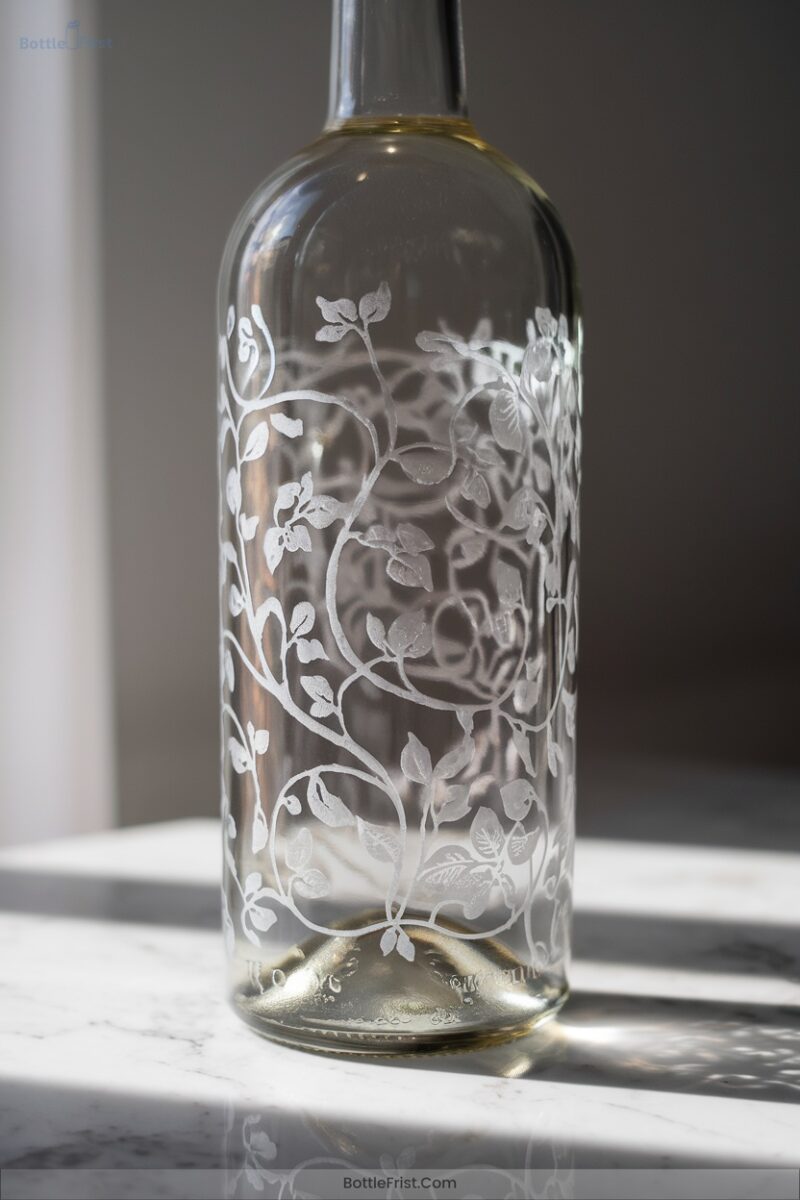
If you’re looking to elevate your glass wine bottle crafts, intricate design etchings provide a mesmerizing way to showcase your creativity and skill.
Utilizing techniques like laser etching for precision or acid etching for a smooth, frosted finish, you can achieve stunning results. Nature motifs, geometric patterns, and cityscape silhouettes are on-trend choices that add sophistication.
- Vinyl stencils guarantee crisp lines.
- Etching cream like Armour Etch delivers consistent results.
- Protective gear keeps you safe while creating.
- Fine-tipped brushes allow for detailed work.
Complete your masterpiece with metallic finishes or LED lights to highlight your etched designs.
16. Multi-Textured Etched Bottles
While exploring the world of multi-textured etched bottles, you’ll discover a domain of endless creative possibilities that bring a tactile elegance to your glass art projects.
Discover endless creative possibilities with multi-textured etched bottles, adding tactile elegance to your glass art projects.
Incorporate sand-carving for deep, intricate designs or use gloss heavy gel for raised textures. Experiment with plastic spoons and scrubber pads to add unique surface patterns.
Enhance your creations with vibrant hand-painted colors or muted tones using Crystal Gloss Enamels. For a rustic charm, wrap twine or hemp cord around the bottle’s neck, and add coastal beads or seashells.
Embrace advanced techniques like micro embossing for fine details and hydrodipping for swirled effects.
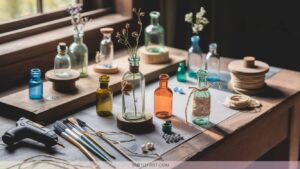
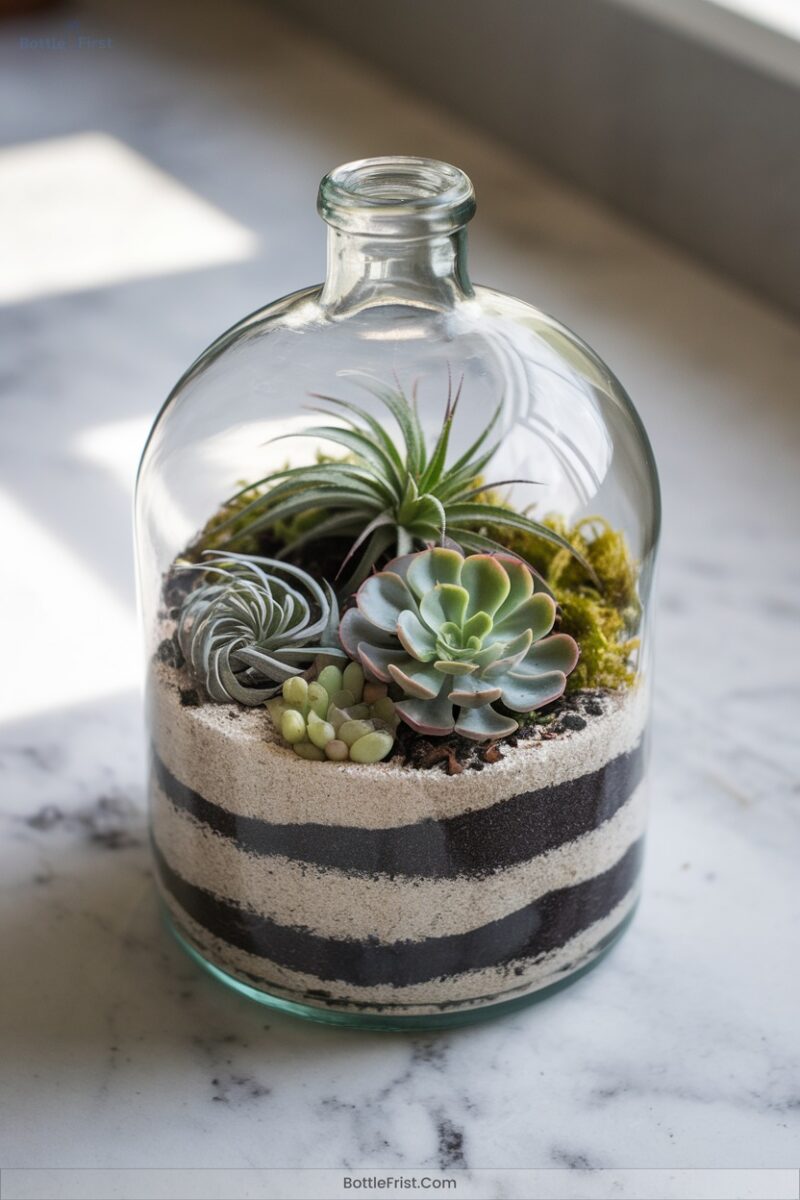
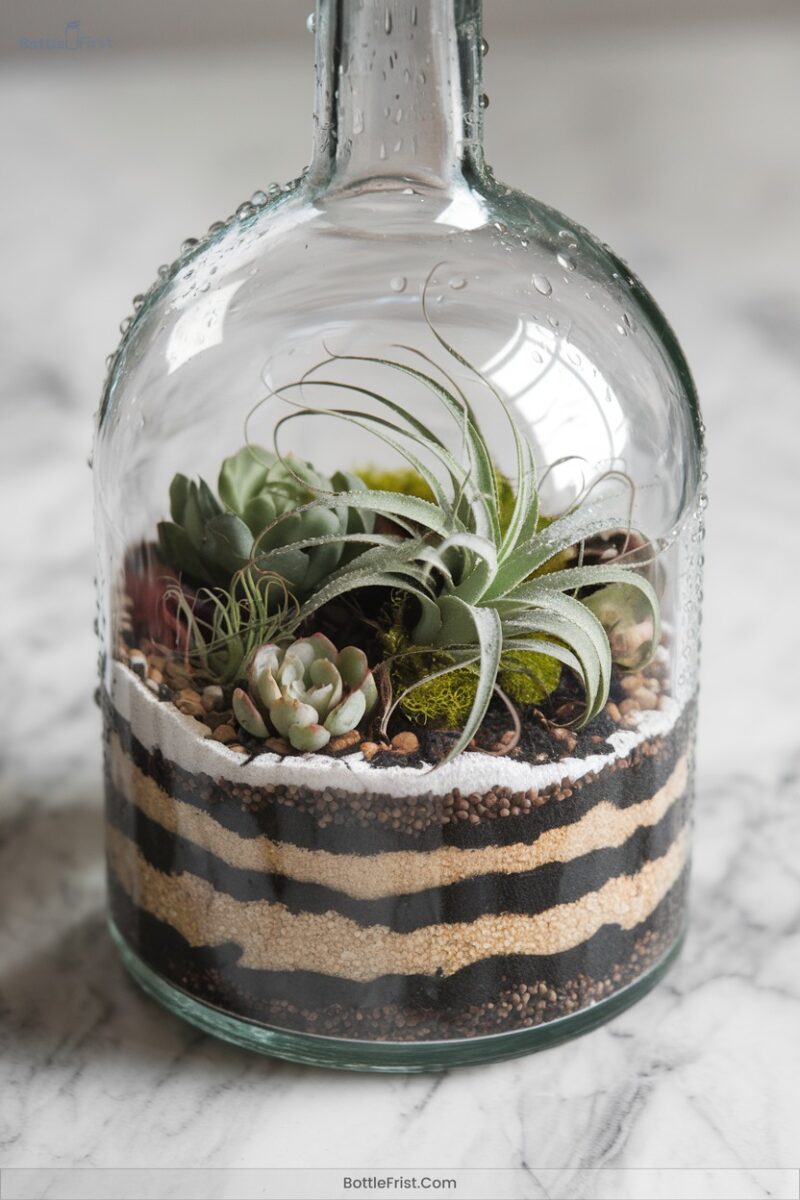
17. Wine Bottle Terrariums

Exploring the artistry of multi-textured etched bottles sets the stage for a new venture into crafting with glass—wine bottle terrariums.
Imagine transforming clear wine bottles into lush, miniature ecosystems. Start by gathering essentials like tweezers, charcoal, and moss.
Carefully layer:
- Small pebbles or gravel for drainage
- Activated charcoal to purify air and water
- Sphagnum moss and potting soil for plant support
- Tiny ferns or colorful Fittonia for greenery
Use a funnel for precision and long tweezers for plant placement. Mist gently, seal with a cork, or leave open.
Keep your masterpiece in indirect light, and watch innovation flourish.
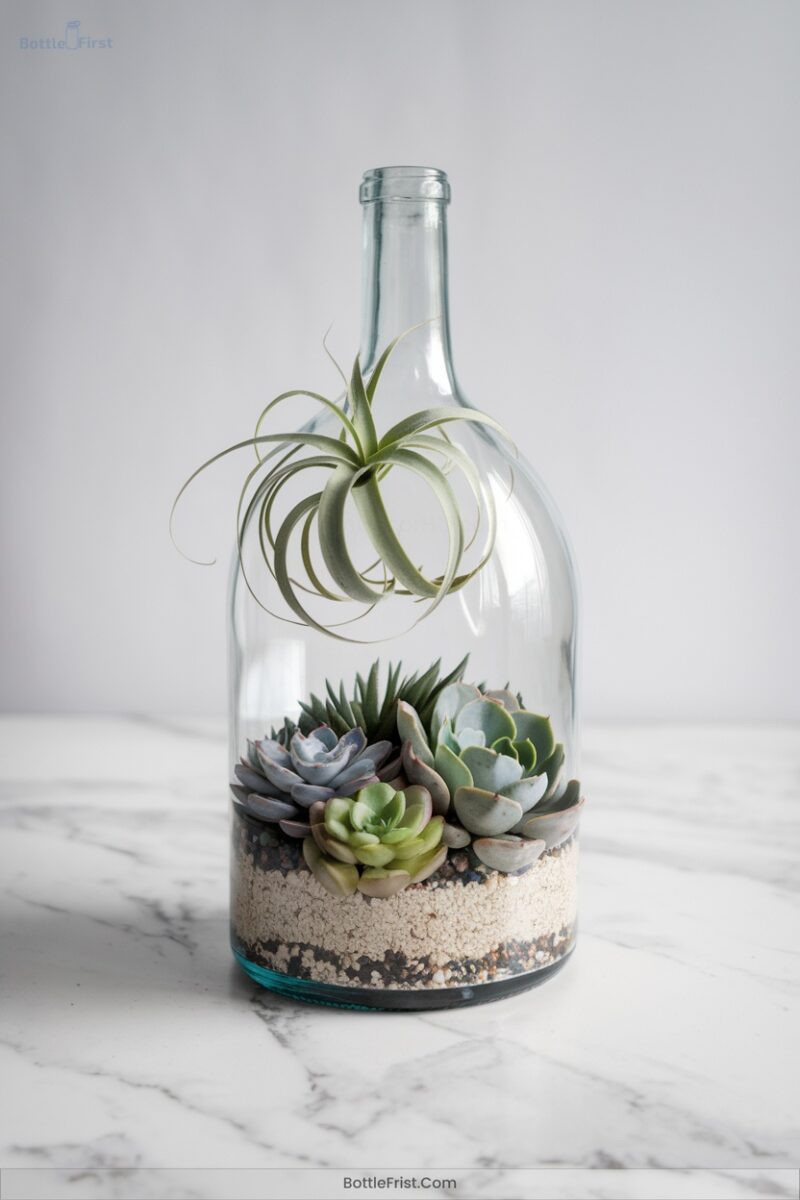
18. Open Terrarium Designs
As the world of indoor gardening evolves, open terrarium designs offer a modern twist on traditional plant displays by blending creativity with nature’s charm.
Imagine using succulents or air plants, like Echeveria or Tillandsia, thriving in a geometric terrarium for a sleek, angular aesthetic.
Succulents and air plants thrive in geometric terrariums, offering a sleek, angular aesthetic.
Opt for hanging glass globes to showcase suspended air plants, or repurpose glassware for a unique touch.
Enhance your terrarium with colored sand, decorative rocks, or even miniature figurines.
Regular maintenance, like adjusting light exposure and occasional pruning, will keep your creation flourishing.
Open terrariums provide endless opportunities to infuse your space with living art.
19. Layering Elements in Terrariums
To create a thriving terrarium, mastering the art of layering elements is essential.
Start with a drainage layer using LECA clay balls or pebbles, about 1-2 inches thick, to prevent waterlogged soil.
Add a separation layer like horticultural fabric to keep soil debris-free.
Follow with a moss layer of sphagnum moss for moisture retention and aesthetic appeal.
Sprinkle a thin activated charcoal layer to filter impurities and odors, ensuring a fresh environment.
Finally, introduce a nutrient-rich substrate layer to anchor your plants.
Each layer plays a significant role, crafting a miniature ecosystem within your elegant glass wine bottle display.
- Drainage Layer: LECA clay balls
- Separation Layer: Horticultural fabric
- Moss Layer: Sphagnum moss
- Activated Charcoal Layer: Filters impurities
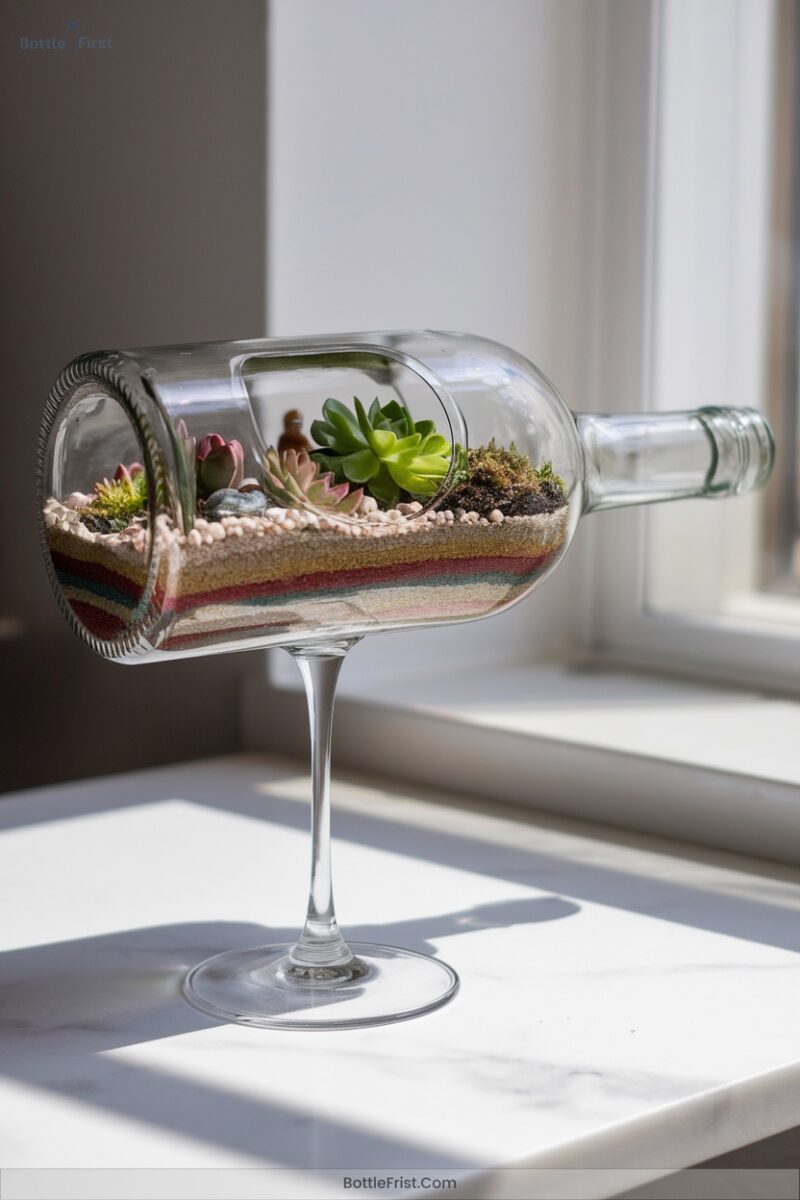
20. Succulent and Air Plant Arrangements
Having mastered the art of layering elements in terrariums, you can now explore the fascinating world of succulent and air plant arrangements within elegant glass wine bottles.
Select compact Echeveria, Sedum, or Haworthia for a lush yet low-maintenance display. Pair them with vibrant Tillandsia like ionantha or the striking xerographica.
Use a well-draining soil mix for succulents and secure air plants with non-toxic glue. Introduce layers of sand, pebbles, and activated charcoal for drainage.
Display your creations by suspending them with macramé, or enhance with LED fairy lights. Rotate your arrangements and enjoy their enduring beauty.
21. Decorative Terrarium Elements
When designing your terrarium, incorporating decorative elements can elevate it from a simple plant display to an enchanting miniature world.
Your creativity can flourish with unique additions like fairy garden accessories or mythical creatures, sparking curiosity and imagination. Enhance the scene with natural elements that add texture and color without the fuss.
Let your imagination soar with whimsical elements that ignite creativity and add effortless charm.
Consider adding:
- Miniature animals to create lifelike scenes.
- Seashells and driftwood for a coastal vibe.
- Colored glass pebbles for vibrant accents.
- Miniature houses to establish a village theme.
These details transform your terrarium into a sophisticated spectacle, perfect for those who crave innovative, stylish decor.
22. Upcycled Wine Bottle Lamps
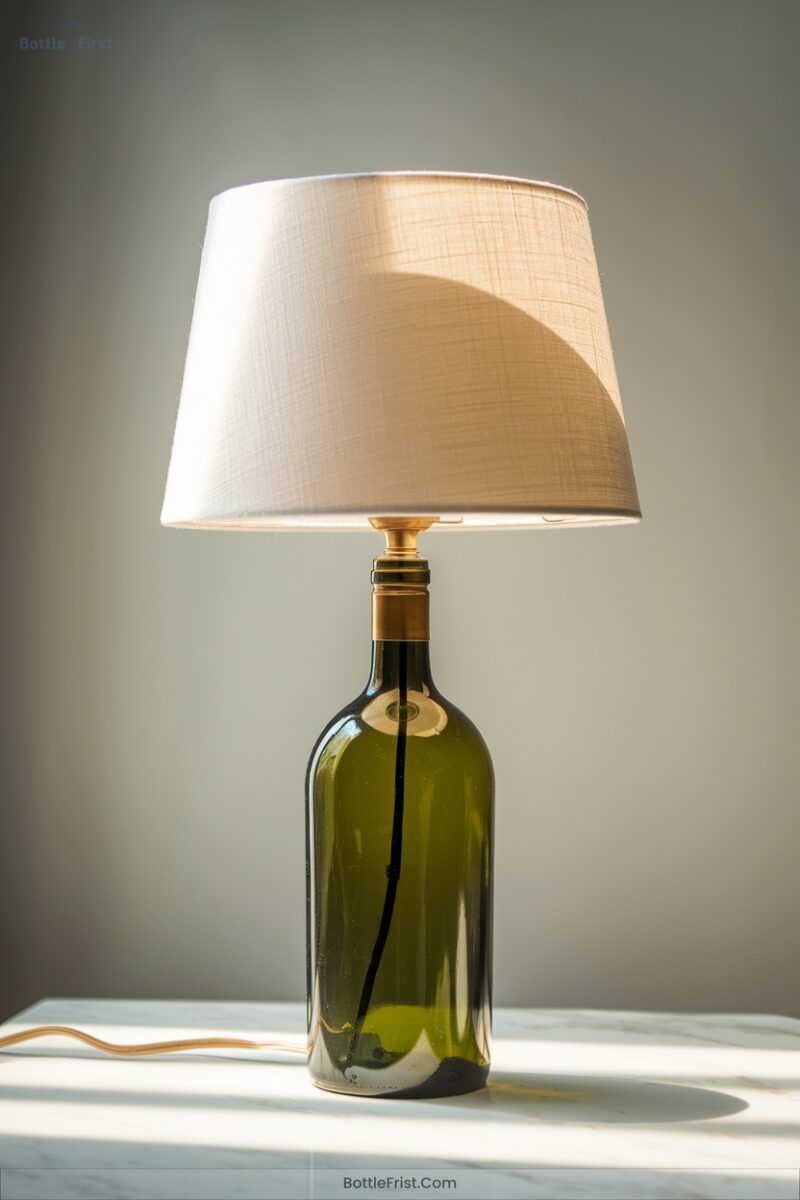
While your terrarium thrives as a miniature oasis, there’s another brilliant way to elevate your home decor: upcycled wine bottle lamps.
Start by cleaning empty wine bottles, removing labels for a sleek finish. With a glass drill bit, create a neat hole for the cord, ensuring safety with eye protection.
Assemble your lamp kit, using rubber adapters for a snug fit. Customize by painting the bottle or selecting a textured lampshade.
Add flair with beads or themes from favorite wineries. These lamps don’t just illuminate; they transform ordinary bottles into sophisticated lighting, a demonstration of sustainable elegance in design.
23. Lamp Kit Installations
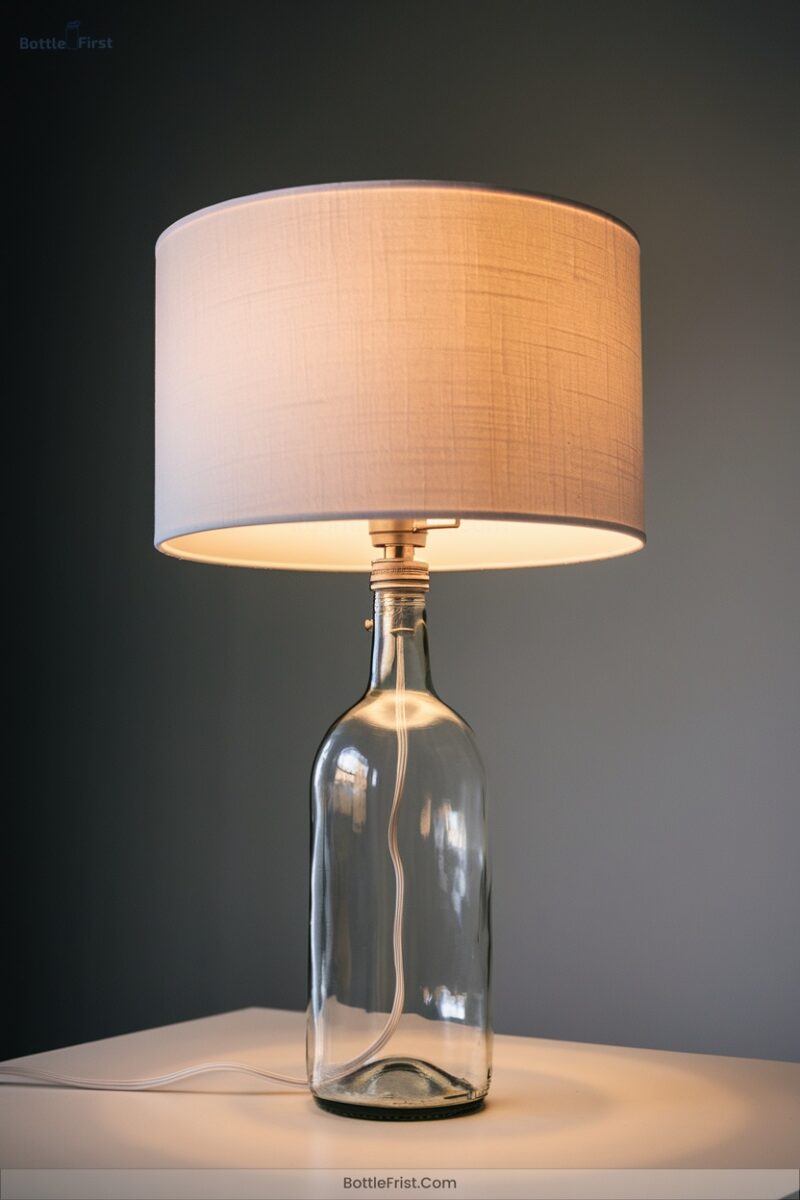
To transform your empty wine bottles into chic lamps, start by gathering all the necessary components of a lamp kit. Consider these essentials:
Gather the essential components of a lamp kit to turn empty wine bottles into chic lamps.
- Socket assembly with threaded tube
- Cord with polarized plug
- Bottle adapter or rubber grommet
- Harp and finial for shade attachment
Begin by thoroughly cleaning and drying your bottle.
Drill a hole for the cord, thread it through, and attach the socket securely inside. Confirm the adapter fits snugly at the neck.
Safety first: use UL-listed kits and keep wattage within limits.
Customize with smart bulbs and stylish cords for a modern touch.
24. Tinted Light Effects With Colored Bottles
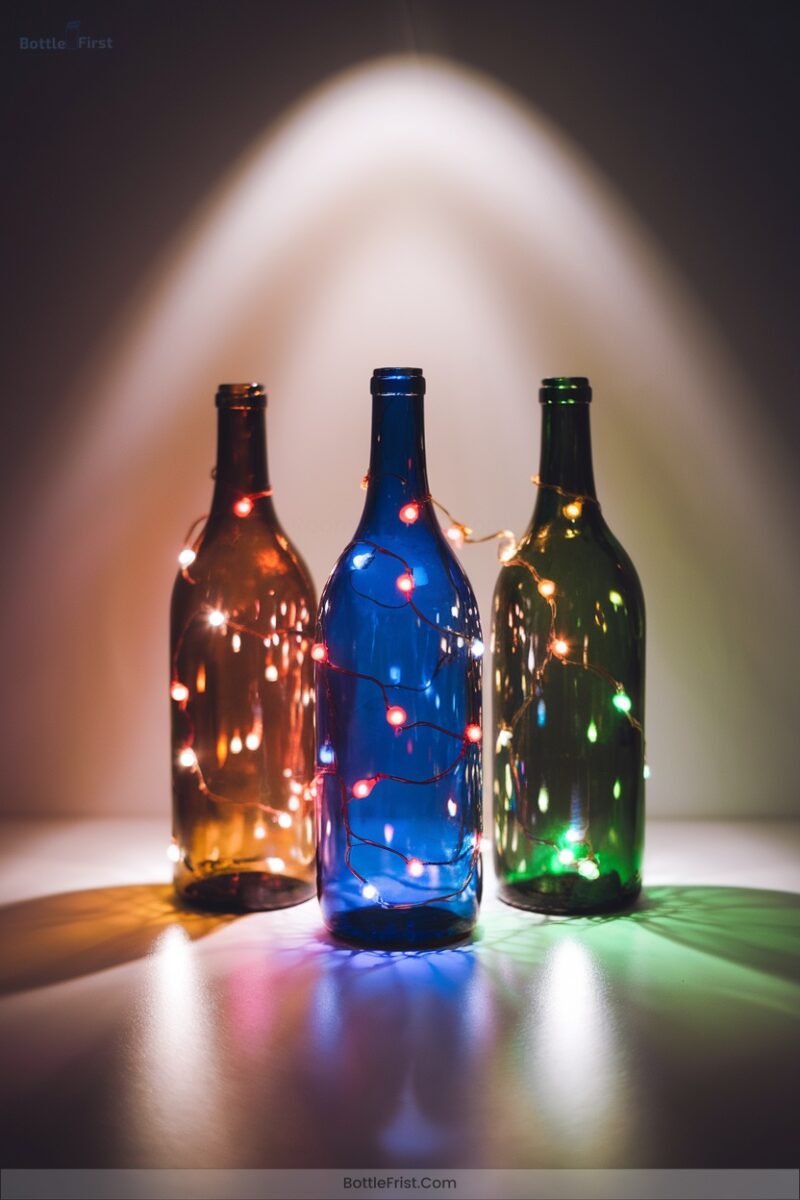
Having mastered the art of transforming wine bottles into elegant lamps, it’s time to explore the enchanting world of tinted light effects with colored bottles.
Choose colored bottles like green, amber, and blue for their unique UV-filtering properties. Green and amber offer excellent UV protection, enhancing wine quality perception.
Use LED strips inside for a warm, ambient glow. Backlighting brings out mesmerizing silhouettes, while diffused lighting and softboxes prevent harsh reflections.
Layer bottles for ombre effects or apply transparent paints for a stained glass look. Your innovative bottle displays will create sophisticated, light-refracting centerpieces perfect for your next elegant gathering.
25. Wine Bottle Serving Trays
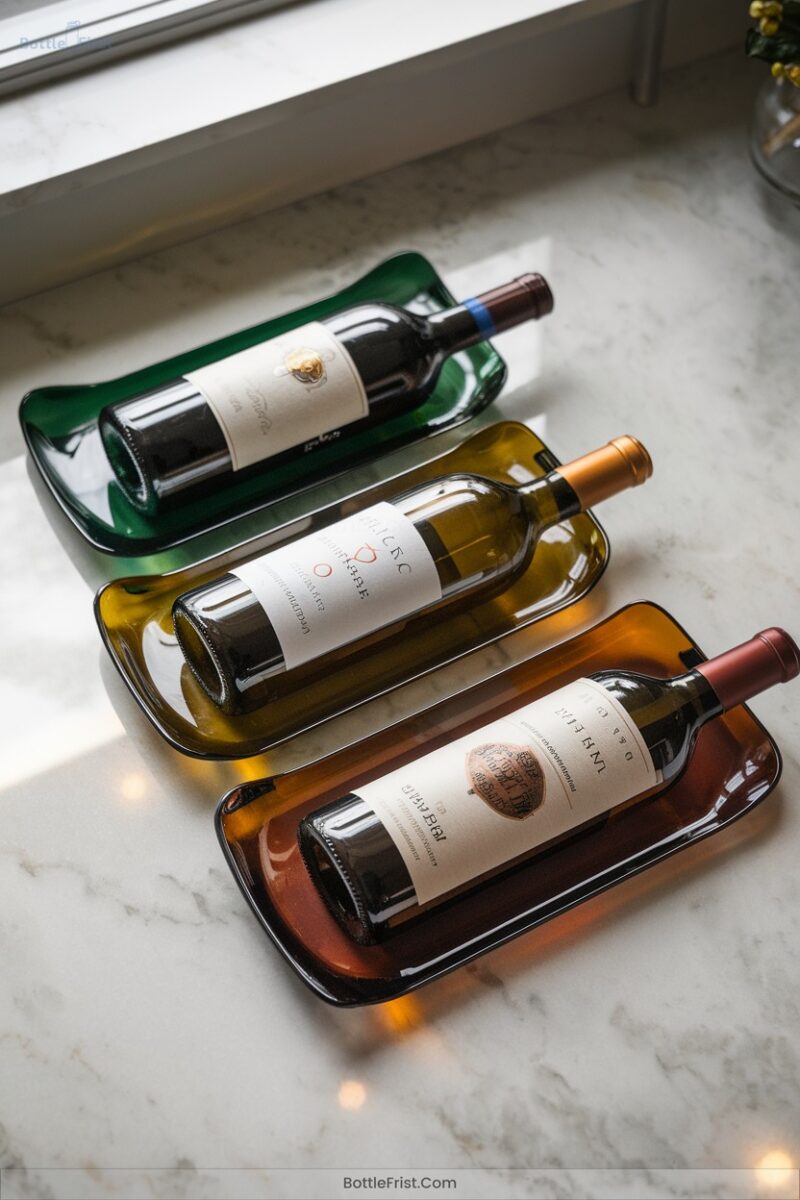
Transform your gatherings with wine bottle serving trays, where form meets function in a display of creativity and style.
These trays redefine sophistication with their innovative designs, offering:
- Flat surfaces balanced on bottle necks for a sleek look.
- Circular trays with central holes, perfectly fitting your favorite bottles.
- Tiered layouts using multiple bottles, adding height and elegance.
- Foldable designs that collapse for convenient storage.
Crafted from reclaimed wood with tempered glass tops, these trays are both durable and chic.
Customize with etched glass, stained finishes, or monograms. They’re a trend-setting addition to any modern entertainer’s toolkit.
Frequently Asked Questions
How Do I Remove Labels From Wine Bottles Easily?
You can easily remove wine bottle labels using a hot water soak or baking soda solution. For tougher adhesives, try the oven heating technique or commercial label removers. Each method offers an innovative, trend-aware approach to label removal.
Can I Use Other Types of Paint on Wine Bottles?
Like an artist finding their muse, you can explore various paints on wine bottles. Acrylic, chalk, spray, and specialty glass paints each offer unique textures and finishes, allowing your creativity to shine and keep you trend-forward.
What Tools Are Needed for Safely Cutting Wine Bottles?
You’ll need a glass bottle cutter, safety goggles, gloves, and a heat source for thermal shock. Add sandpaper, a ruler, and a marker for precision. These tools guarantee your wine bottle projects are innovative and safe.
Are There Specific Wines That Are Better for Crafting?
You should choose wines with unique bottle shapes, like Champagne or Pinot Noir, for crafting. Look for colored glass or clear bottles from brands like Veuve Clicquot, which add flair and showcase your artistic creativity.
How Do I Prevent Glass From Cracking During Crafting?
When crafting, prevent glass from cracking by gradually heating and cooling it. Choose heat-resistant glass, preheat with warm water, and follow proper annealing techniques. Smooth edges meticulously and guarantee compatibility between glass types for innovative projects.
Conclusion
You’ve mastered transforming wine bottles into elegant art pieces, perfect for any sophisticated gathering. Imagine hosting friends for a dinner party, and as they admire the ombre wine bottle vases on your table, they ask about your secret.
You proudly share how you crafted them, blending creativity with trend-aware techniques like metallic accents and stenciled patterns. By upcycling wine bottles into unique decor, you’ve not only impressed your guests but also added a personal, stylish touch to your entertaining space.