A DIY water bottle drying rack is a practical and inexpensive solution for drying reusable water bottles. It’s a simple project that requires just a few materials: a wooden board, dowels, and a drill.
The DIY water bottle drying rack is a great way to organize and dry your water bottles after they have been washed. It’s a straightforward project that even beginners can handle.
All you need to do is drill holes into the wooden board, insert the dowels, and voila! You have your very own water bottle drying rack.
Customizable according to the number and size of water bottles.
Cost-effective as it’s made from affordable materials.
Environmentally friendly by promoting the use of reusable water bottles.
Easy to clean and maintain.
The DIY water bottle drying rack not only aids in drying your water bottles efficiently but also helps keep your kitchen counter clutter-free. It’s a stylish and functional addition to any kitchen.
Furthermore, it encourages the use of reusable water bottles, which is beneficial to the environment.
7 Steps to DIY Water Bottle Drying Rack
Step
Materials Needed
Instructions
1
Water bottles, towel
Rinse out water bottles and shake out excess water.
2
Tray or flat surface
Place a towel on a tray or flat surface.
3
Water bottles
Lay the bottles on their sides on the towel.
4
Open space
Ensure there is enough open space around each bottle to allow air circulation.
5
Time
Allow the bottles to dry completely.
6
Extra towel
If necessary, change out the towel for a dry one to speed up the drying process.
7
Storage area
Once dry, store the water bottles in a clean, dry area.
A DIY water bottle drying rack is a convenient and cost-effective solution for drying water bottles.
The DIY drying rack can be customized according to your needs and space availability.
It is a creative and innovative way to keep your water bottles organized.
Making and using a DIY drying rack can also help in reducing environmental waste as it encourages recycling.
Five Facts About Building a DIY Water Bottle Drying Rack
The concept of DIY water bottle drying rack is gaining popularity due to its practicality and ease of creation. You can use simple household materials like wires, plastic pipes, or even wooden dowels to make one.
It promotes a higher level of hygiene as water bottles can be dried and stored upright in an organized manner, preventing any potential growth of bacteria and molds (Source: National Institute of Health).
Creating a DIY water bottle drying rack not only saves money but also provides a fun crafting activity which can be done with family or friends (Source: DIY and Crafts Magazine).
Besides being eco-friendly, using your customized DIY drying rack would mean that you are not reliant on commercially bought variants that may not suit your specific needs (Source: Environmental Protection Agency).
The DIY drying rack can be easily disassembled and stored away when not in use, making it an excellent choice for space-conscious individuals (Source: Home Decor and Space Management Journal).
Why You Need A Diy Water Bottle Drying Rack
Drying water bottles can be a tedious and time-consuming task, especially if you have a large collection or frequently use them.
Having a diy water bottle drying rack can simplify this process while providing several benefits. In this section, we will explore why you need a diy water bottle drying rack and how it can improve your kitchen routine.
Prevents The Accumulation Of Bacteria
A diy water bottle drying rack ensures proper airflow around the bottles, preventing the accumulation of bacteria and mold.
Here’s why it matters:
Bacteria thrive in moist environments, and if your water bottles don’t dry completely, it creates an ideal breeding ground for harmful microorganisms.
By using a drying rack, you can minimize the risk of contamination and maintain the cleanliness of your water bottles.
Properly dried bottles reduce the chances of bacterial growth, protecting you and your family from potential health issues.
Ensures Efficient Drying Without Water Spots
One of the most frustrating aspects of drying water bottles is the inevitable water spots that can form.
Here’s how a diy water bottle drying rack can help:
The design of a drying rack allows water to drain off the bottles, ensuring efficient drying without leaving behind any unsightly water spots.
Water spots not only make your bottles look unappealing but can also lead to mineral deposits and stains over time.
With a drying rack, you can say goodbye to water spots and ensure your water bottles dry flawlessly, ready to be used again.
Saves Kitchen Countertop Space
Another key advantage of a diy water bottle drying rack is its ability to save valuable kitchen countertop space.
Consider the following points:
By utilizing a dedicated drying rack, you no longer need to rely on limited countertop space or lay bottles down in dish racks, taking up precious room.
With an organized drying rack, you can neatly dry multiple water bottles simultaneously, efficiently using the vertical space rather than spreading out horizontally.
This not only frees up your kitchen countertop but also keeps your space tidy and clutter-free.
Investing in a diy water bottle drying rack is a smart and practical solution for anyone who wants to ensure hygienic, spotless, and well-organized water bottles.
With the prevention of bacterial growth, efficient drying without water spots, and the added benefit of saving kitchen countertop space, you’ll wonder how you managed without one.
Take the time to create your own drying rack, and make an impactful change to your daily kitchen routine.
How To Choose The Perfect Diy Water Bottle Drying Rack
When it comes to choosing the right diy water bottle drying rack, there are a few key factors to consider.
Having a reliable and efficient drying rack can make the process of cleaning and drying your water bottles a breeze.
Here are some important points to keep in mind:
Consider The Size And Capacity
Evaluate the size and capacity of the drying rack to ensure it can accommodate the number of water bottles you need to dry at once.
Think about the available space in your kitchen or designated area for the rack and choose a size that fits comfortably without causing clutter.
A rack with adjustable dividers or shelves can be useful, allowing you to customize the layout according to the size and shape of your water bottles.
Look For Sturdy Materials
Opt for a drying rack that is made from durable and strong materials such as stainless steel or bpa-free plastic.
Consider the weight-bearing capacity of the rack, ensuring it can support the weight of multiple water bottles without bending or breaking.
Check for any rubberized or non-slip features that will keep the rack stable and prevent it from sliding or toppling over.
Opt For Collapsible Or Space-Saving Designs
If you have limited counter or storage space, consider a drying rack that can be collapsed or easily disassembled when not in use.
Look for racks that have a foldable or stackable design, allowing you to store them compactly when you don’t need them.
Choosing a space-saving design will help you maximize the available area in your kitchen and keep your countertops clutter-free.
Remember to consider your specific needs and preferences when selecting a diy water bottle drying rack.
By considering the size and capacity, choosing sturdy materials, and opting for collapsible or space-saving designs, you can find the perfect rack to make the drying process efficient and convenient.
Step-By-Step Guide To Building Your Own Diy Water Bottle Drying Rack
Gather The Necessary Materials
To start building your own diy water bottle drying rack, you will need the following materials:
Pvc pipes: Get pvc pipes with a diameter suitable for holding water bottles.
Pvc pipe connectors: Purchase connectors that match the diameter of the pipes.
Adhesive or screws: Choose adhesive suitable for bonding pvc or screws that are compatible with the material.
Saw or pipe cutter: Use a saw or pipe cutter to cut the pvc pipes to the desired lengths.
Measuring tape: Take accurate measurements to ensure the rack is the right size.
Sandpaper: Smooth the edges of the cut pvc pipes for a professional finish.
Measure And Cut The Rack’S Dimensions
Now that you have gathered all the necessary materials, it’s time to measure and cut the dimensions for your water bottle drying rack.
Follow these steps:
Measure the available space: Determine the area where you plan to place the rack and take measurements to ensure it fits perfectly.
Decide on the rack’s height and width: Based on the number of water bottles you typically wash and dry, determine the ideal height and width for the rack. Consider factors such as countertop space and storage convenience.
Mark the pvc pipes: Using a measuring tape, mark the desired lengths on the pvc pipes. Double-check your measurements before proceeding to the next step.
Cut the pvc pipes: Using a saw or pipe cutter, carefully cut the pvc pipes according to the marked measurements. Make sure to cut straight for accurate assembly.
Smooth the cut edges: After cutting the pvc pipes, use sandpaper to smooth any rough edges. This will prevent scratches on the water bottles and give the rack a neat appearance.
Assemble The Pieces Using Adhesive Or Screws
With the dimensions cut and smoothed, you are now ready to assemble the pieces of your diy water bottle drying rack.
Depending on your preference and the materials you have, choose either adhesive or screws for assembly.
Follow these steps:
Apply adhesive or insert screws: If using adhesive, apply it to the connecting ends of the pvc pipes and connectors. Ensure each joint is thoroughly covered with adhesive. Alternatively, if you’re using screws, insert them through the connectors and into the pvc pipes.
Connect the pipes and connectors: Join the cut pvc pipes with the connectors, aligning them carefully according to your rack’s dimensions. Press or screw them together firmly to create a sturdy connection.
Double-check the assembly: Once you have connected all the pieces, double-check the rack’s stability and alignment. Make any necessary adjustments to ensure it stands straight and securely holds the water bottles.
Let it cure or tighten screws: If using adhesive, allow sufficient time for it to cure and bond the pvc pipes securely. If using screws, tighten them firmly to ensure a strong and stable rack.
Congratulations!
You’ve successfully built your own diy water bottle drying rack. Now you can use it to dry your water bottles efficiently and keep your kitchen organized.
Creative And Eco-Friendly Diy Water Bottle Drying Rack Ideas
Are you tired of bottles cluttering your countertops after washing them? Are you looking for creative and eco-friendly solutions to dry your water bottles efficiently?
Look no further! We will explore three diy ideas to create your own water bottle drying rack.
These ideas are not only resourceful but also sustainable, allowing you to contribute to the environment while solving a common problem.
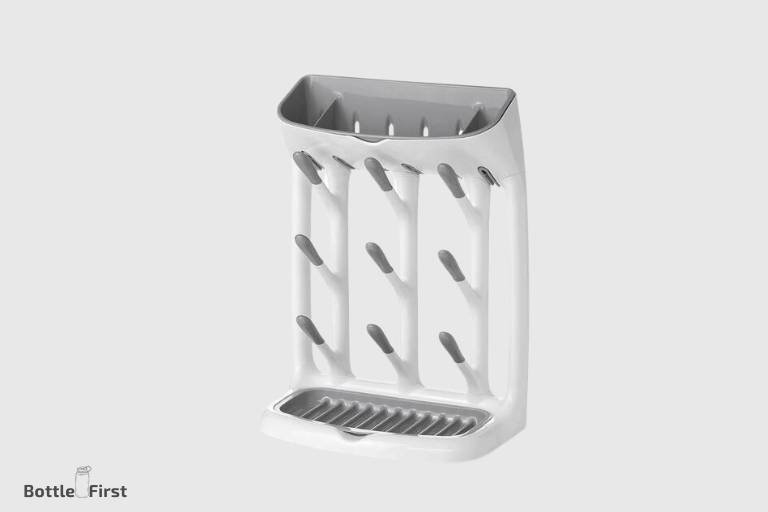
Upcycle A Wooden Utensil Holder
Repurpose: Old wooden utensil holders can have a new life as a water bottle drying rack.
Versatility: The compartments in utensil holders provide an ideal space for bottles of various sizes and shapes.
Cost-effective: Upcycling an item you already have saves money and reduces waste.
Easy installation: Attach the holder to a wall or position it on your countertop for convenient access and drying.
Repurpose A Pegboard Into A Drying Rack
Customization: A pegboard allows you to arrange hooks or pegs according to your needs, accommodating different bottle sizes.
Space-saving: By mounting the pegboard on a wall, you can free up valuable countertop space.
Multi-purpose: In addition to drying water bottles, you can use the same pegboard for hanging other kitchen items like utensils, cutting boards, and oven mitts.
Efficient drying: The open design of the pegboard ensures proper ventilation, allowing bottles to dry quickly.
Create A Magnetic Drying Rack For Metal Bottles
Ingenious solution: Metal bottles can be dried efficiently using a magnetic drying rack.
Easy installation: Attach magnetic strips to a wall or inside a cabinet door.
Sturdy support: The strong magnetic force will securely hold the metal bottles in place.
Flexibility: The magnetic strips can be cut to any length, adapting to the available space.
Space-saving: By using vertical space, you can maximize the use of your kitchen area.
With these creative and eco-friendly diy water bottle drying rack ideas, you can say goodbye to the inconvenience of wet bottles cluttering your kitchen.
By repurposing everyday items like wooden utensil holders, pegboards, or using magnetic strips, you not only solve a practical problem but also contribute to a sustainable lifestyle.
So, why wait? Get creative and start drying your water bottles in style!
Maintenance And Cleaning Tips For Your Diy Water Bottle Drying Rack
Keeping your diy water bottle drying rack clean and well-maintained is essential to ensure it remains hygienic and functional.
Regular cleaning and maintenance will help prevent bacteria growth, remove any residue, and prolong the lifespan of your rack. Here are some important tips to keep in mind:
Regularly Sanitize The Rack To Avoid Bacteria Growth
Proper sanitization is a crucial step in maintaining a clean and hygienic water bottle drying rack.
Here’s how you can do it:
Start by disassembling the rack, if possible, to access all its nooks and crannies.
Mix a solution of warm water and mild dish soap in a sink or large basin.
Submerge all the parts of the rack in the soapy water, ensuring they are completely covered.
Use a soft brush to gently scrub away any dirt, stains, or bacteria buildup, paying attention to hard-to-reach areas.
Rinse the rack thoroughly with clean water to remove any soap residue.
Finally, allow all the parts to air dry completely before reassembling the rack.
Remember to sanitize your diy water bottle drying rack on a regular basis, especially if it is used frequently or exposed to moisture.
Use A Soft Brush To Remove Any Built-Up Residue
Over time, residue from water bottle drips, soap, or other substances may accumulate on your drying rack. It is important to remove this residue to prevent it from becoming a breeding ground for bacteria.
Here’s how you can do it:
Take a soft-bristled brush, such as a toothbrush or dish brush.
Wet the brush slightly and gently scrub any visible residue on the drying rack.
Focus on areas where water bottles come into contact with the rack, such as individual prongs or slots.
If the residue is stubborn, you can use a mixture of equal parts vinegar and water as a natural cleaning solution.
Once the residue has been removed, rinse the rack thoroughly with clean water.
Allow the rack to air dry completely before using or storing it.
Regularly removing built-up residue from your diy water bottle drying rack will help maintain cleanliness and prevent any unwanted odors or bacteria growth.
Allow The Rack To Thoroughly Dry Before Storing It
Properly drying your diy water bottle drying rack is essential to prevent moisture buildup and potential mold or mildew growth.
Follow these steps to ensure your rack is completely dry before storage:
After cleaning or washing the rack, shake off any excess water.
Place the rack in a well-ventilated area to allow maximum airflow.
If possible, leave the rack disassembled to ensure all parts dry thoroughly.
Patience is key. Depending on the size and design of your rack, drying time may vary. It is recommended to leave it for at least a few hours, or overnight if possible.
Before reassembling or storing the rack, make sure each part is completely dry to avoid trapping moisture.
By allowing your diy water bottle drying rack to air dry thoroughly, you can prevent the growth of bacteria and keep it in good condition for future use.
Remember, proper maintenance and cleaning of your diy water bottle drying rack is crucial for hygiene and functionality.
Following these tips will help you keep your rack clean, free from residue, and ready to use whenever needed.
Happy drying!
How Can I Make a DIY Air Conditioner Fan Water Bottle?
Making a diy air conditioner fan water bottle is easier than you think. Start by filling a 2-liter bottle with ice and cold water. Attach a small fan to the cap of the bottle, ensuring it blows towards you. As the fan blows over the frozen bottle, it creates a cooling breeze.
FAQ About Diy Water Bottle Drying Rack
How Do You Make A Diy Water Bottle Drying Rack?
To make a diy water bottle drying rack, you can repurpose a dish drying rack or use a wire hanger.
Why Is A Water Bottle Drying Rack Important?
A water bottle drying rack is important to ensure thorough drying, preventing mold and unpleasant odors.
What Are The Benefits Of Using A Diy Water Bottle Drying Rack?
Using a diy water bottle drying rack helps to save space, keep bottles organized, and promote proper drying.
Can I Customize A Diy Water Bottle Drying Rack?
Yes, you can customize a diy water bottle drying rack by adding additional hooks or compartments to suit your needs.
How Do I Maintain A Diy Water Bottle Drying Rack?
To maintain a diy water bottle drying rack, regularly clean it with mild soap and water, ensuring it is dry before use.
Conclusion
To summarize, creating a diy water bottle drying rack is a cost-effective and practical solution for keeping your water bottles clean and dry.
By using simple materials like pvc pipes and hangers, you can easily customize a rack that fits your needs and space.
This diy project not only helps you maintain a clutter-free kitchen area but also contributes to a more sustainable lifestyle by encouraging the reuse of water bottles.
With the step-by-step instructions provided in this blog post, you can create your own drying rack in no time.
Remember to choose sturdy materials and follow safety precautions during the construction process.
By incorporating this diy drying rack into your routine, you can save time, money, and reduce the risk of bacterial growth in your water bottles.
Give it a try and enjoy the benefits of a well-organized and hygienic kitchen!