How to Make Water Bottle Car? 10 Easy Steps
Creating a water bottle car involves an easy step-by-step process using a few household items including a water bottle, plastic straws, bottle caps and a pair of scissors.
This project is perfect for teaching children about basic principles of physics and mechanics in a fun and hands-on way.
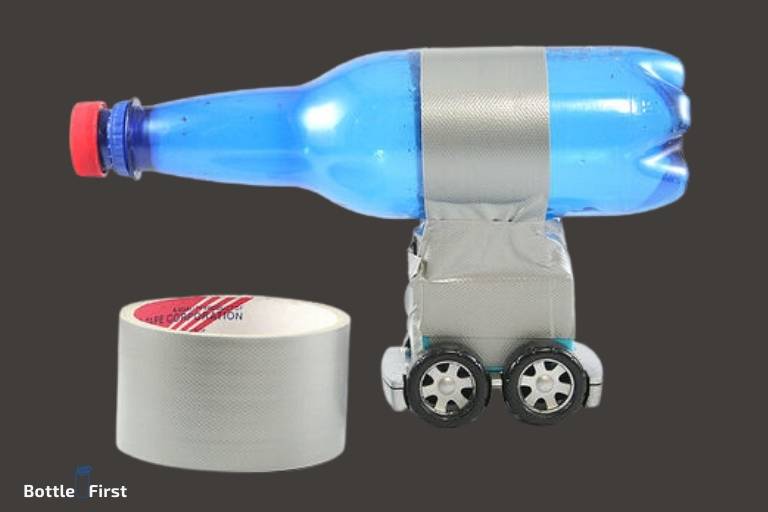
To make a water bottle car, you start by preparing the body of your car using the water bottle. You then create the wheels out of bottle caps and use the plastic straws to serve as axles.
Once everything is assembled, your water bottle car is complete. It’s a simple project that combines creativity and learning, making it a great activity for kids.
Creating a water bottle car is not only a fun DIY project, but it also lays the groundwork for learning basic physics. When kids create the car, they learn about concepts such as friction, motion, and force.
Additionally, this project encourages recycling and creativity, making it a valuable activity for children of all ages.
10 Steps for Making a Water Bottle Car
| Step No. | Tools Needed | Instructions |
|---|---|---|
| 1 | Empty water bottle | Choose an empty and cleaned water bottle. |
| 2 | Four bottle caps | Get four plastic bottle caps. These will act as the wheels. |
| 3 | Hot glue gun | Use the hot glue gun to attach the four bottle caps to the bottle. |
| 4 | Plastic straw | Cut the straw into 4 equal lengths. |
| 5 | Hot glue gun | Attach the straw pieces to the bottle caps using the hot glue gun. |
| 6 | Bamboo skewers | Insert bamboo skewers in the straw pieces to work as the axles. |
| 7 | Rubber bands | Attach the rubber bands to the bamboo skewers to create the motor. |
| 8 | Scotch tape | Use scotch tape to secure the rubber bands in place. |
| 9 | Plastic straw | Attach another straw to the top of the bottle to act as a windup key. |
| 10 | Permanent Marker | Use a permanent marker to design and decorate your water bottle car. |
Key Takeaway
Fascinating Facts About Water Bottle Cars
Introduction To Water Bottle Cars
What Are Water Bottle Cars?
Water bottle cars are diy projects that involve building a miniature vehicle using recycled water bottles as the primary component.
These unique creations are not only fun to make but also serve as an educational activity for both children and adults.
By repurposing plastic bottles, you can transform waste into a functional and entertaining toy car.
With a few simple materials and some creativity, you can construct your own water bottle car and enjoy hours of playtime.
Why Are Water Bottle Cars An Interesting Diy Project?
There are several reasons why water bottle cars make for fascinating diy projects:
- Creativity: Building a water bottle car allows you to unleash your creativity and design skills. You have the freedom to customize the car according to your preferences, making each creation truly unique.
- Sustainability: By utilizing discarded water bottles, you contribute to reducing waste and promoting sustainability. Repurposing plastic bottles for this project helps reduce their negative impact on the environment.
- Hands-on learning: Constructing a water bottle car provides an opportunity for hands-on learning. It involves aspects of engineering, physics, and problem-solving, making it an educational endeavor for both children and adults.
- Affordable: Creating a water bottle car is a budget-friendly project. Most of the required materials can be easily sourced from around the house, making it accessible to those on a tight budget.
- Fun and entertainment: Once completed, water bottle cars offer endless fun and entertainment. You can race them, create obstacle courses, or even organize friendly competitions with friends and family.
The Benefits Of Making A Water Bottle Car:
Making a water bottle car offers various advantages:
- Encourages resourcefulness: Building a water bottle car fosters resourcefulness by repurposing everyday items and transforming them into a functional toy.
- Enhances problem-solving skills: Throughout the process of constructing a water bottle car, you encounter various challenges that require problem-solving skills. This exercise helps enhance critical thinking and creativity.
- Promotes stem education: Water bottle car projects involve elements of science, technology, engineering, and math (stem). Engaging in this diy activity can stimulate interest in these subjects at an early age.
- Boosts environmental awareness: By using recycled materials, water bottle cars promote environmental awareness and the importance of sustainability.
- Provides a sense of accomplishment: Successfully building and racing a water bottle car brings a sense of accomplishment and satisfaction. It showcases your ability to create something functional with your own hands.
Now that you have a better understanding of what water bottle cars are and why they make interesting diy projects, let’s delve into the step-by-step process of creating your very own water bottle car. Stay tuned for the next section!
Materials And Tools Needed
List Of Materials Required
To build a water bottle car, you will need the following materials:
- Water bottle: The main component of the car body. Choose a sturdy and lightweight water bottle for optimal performance.
- Bottle caps: These will serve as the wheels of the car. Make sure to collect enough bottle caps to match the number of wheels you want to use.
- Skewers or dowels: These will be used as axles for the wheels. Make sure they are long enough to fit across the width of the water bottle.
- Rubber bands: You will need rubber bands to secure the wheels to the axles. They should be strong and stretchy enough to hold the wheels in place.
- Straws: Cut straws into smaller pieces to act as spacers between the wheels and the body of the car.
- Hot glue or super glue: This will be used to attach the axles and the spacers to the water bottle. Make sure to use a strong adhesive that can withstand the weight and movement of the car.
- Decorative materials: You can personalize your water bottle car by adding stickers, paint, or any other decorative elements you like.
Tools Required For Building A Water Bottle Car
To assemble your water bottle car, you will need the following tools:
- Scissors: Use scissors to cut the straws into smaller pieces and to trim any excess parts of the materials.
- Pliers: Pliers will come in handy when bending the skewers or dowels to fit the water bottle.
- Hacksaw or wire cutters: Use a hacksaw or wire cutters to trim the skewers or dowels to the desired length.
- Hot glue gun or super glue applicator: This tool is essential for securely attaching the axles, wheels, and spacers to the water bottle.
- Optional: Paintbrushes, markers, or other tools for decorating the water bottle car.
Where To Source The Necessary Materials And Tools
You can easily find the materials and tools needed for building a water bottle car at various places.
Here are a few suggestions:
- Local craft stores: Visit your nearest craft store to find water bottles, bottle caps, rubber bands, straws, and adhesive materials. They usually stock a wide range of crafting supplies.
- Dollar stores: Check out your local dollar store for affordable water bottles and other necessary materials. They often have a variety of options to choose from.
- Recycling centers: If you’re looking for water bottles and bottle caps, consider visiting recycling centers. They often have a surplus of these items that you can acquire for free or at a low cost.
- Online retailers: Websites like amazon, ebay, and craft supply websites offer a vast selection of materials and tools for building a water bottle car. You can compare prices, read reviews, and have the items conveniently delivered to your doorstep.
Now that you have a list of materials and tools required, it’s time to roll up your sleeves and get ready to build your very own water bottle car!
Step-By-Step Guide On Building A Water Bottle Car
Building a water bottle car can be a fun and interactive project that allows you to explore the basics of engineering and design.
With just a few simple materials and some creative thinking, you can create your very own water bottle car.
In this step-by-step guide, we will walk you through the process of constructing a water bottle car from start to finish.
Preparing The Base Of The Water Bottle Car
Before diving into the construction process, it’s important to choose a suitable base for your water bottle car.
Here are the key points to consider when preparing the base:
- Sturdy materials such as plywood or thick cardboard work well as a base for your water bottle car.
- Ensure the base is large enough to support the weight of the water bottles and any additional components you plan to add.
- Cut the base into a rectangular or square shape, depending on your preferred design.
Attaching The Wheels To The Base
The wheels are a vital component of the water bottle car as they provide mobility.
Follow these steps to attach the wheels to the base:
- Choose four wheels that are durable and suitable for the terrain you plan to use the car on.
- Position the wheels at each corner of the base and mark where the screw holes should be.
- Use screws or bolts to secure the wheels to the base, ensuring they are tightly fastened.
Assembling The Water Bottle Car’S Body
The body of the water bottle car is what gives it shape and structure.
Here’s how you can assemble the body:
- Create a frame using thin wooden or plastic rods, shaping it according to your desired design.
- Attach the frame to the base using glue or screws, ensuring it is stable and secure.
- Consider adding additional support structures or reinforcements to strengthen the body.
Creating A Frame For The Car
To prevent the water bottles from rolling off the car, you’ll need to create a frame to hold them in place.
Follow these steps:
- Cut two long strips of cardboard or plastic that are wide enough to fit around the water bottles.
- Attach these strips vertically to the base using glue or tape, creating a secure frame.
- Ensure the frame is tall enough to hold the water bottles securely in place without obstructing their movement.
Attaching The Water Bottles Securely
The water bottles serve as the power source for the car.
Here’s how you can attach them securely:
- Use strong adhesive or tape to attach the water bottles to the frame.
- Position the water bottles in a way that evenly distributes their weight and maintains balance.
- Ensure the attachment is firm and secure to prevent the water bottles from coming loose during the car’s operation.
Designing The Propulsion System
The propulsion system is what drives the water bottle car forward.
Let’s explore the key points in designing this system:
- Consider the type of propulsion you want for your car, such as rubber bands, compressed air, or a balloon.
- Take into account the size and weight of your car when choosing the appropriate propulsion method.
- Remember to ensure the propulsion system is safe and easy to operate.
Choosing The Type Of Propulsion
When it comes to choosing the propulsion method, you have a few options.
Here are some key considerations:
- Rubber bands can be wound up and released to generate power for the car.
- Compressed air can be used by creating a pressure chamber that propels the car forward.
- A balloon can be inflated and released to provide the necessary force for movement.
Installing The Propulsion Method
Once you’ve chosen the type of propulsion, it’s time to install it into your water bottle car.
Follow these steps:
- Depending on the chosen method, attach the rubber bands, pressure chamber, or balloon to the car.
- Make sure the propulsion method is securely fastened and aligned with the wheels for optimal performance.
- Test the propulsion system to ensure it functions effectively before moving on to the next step.
Implementing The Steering Mechanism
To navigate your water bottle car, you’ll need a steering mechanism in place.
Consider these different options:
- Simple front-wheel steering can be achieved by attaching a small wheel or swivel caster to the front of the car.
- A rear-wheel steering system can also be implemented by attaching a wheel or caster to the back and linking it to a steering handle.
Installing A Steering Mechanism Suitable For Water Bottle Cars
Once you’ve decided on the steering mechanism, it’s time to install it.
Follow these steps:
- Attach the chosen steering mechanism to the car, ensuring it is properly aligned with the wheels.
- Test the steering mechanism to ensure it allows for smooth and controlled movement.
- Make any necessary adjustments to the steering mechanism until you are satisfied with its functionality.
Adding Finishing Touches And Enhancements
To make your water bottle car truly unique, you can add some finishing touches and enhancements.
Consider these ideas:
- Paint the car using bright colors or patterns to give it a visually appealing look.
- Decorate it with stickers, decals, or even personal artwork to show off your creativity.
- Add additional features such as headlights, spoilers, or mirrors to enhance the car’s aesthetics and functionality.
By following this step-by-step guide, you can create your very own water bottle car and enjoy the excitement of watching it zoom across various surfaces.
So gather your materials, unleash your creativity, and embark on this thrilling engineering adventure!
Tips And Tricks For Building A Successful Water Bottle Car
Building a water bottle car can be a fun and educational project for both kids and adults.
Whether you’re participating in a competition or simply creating a cool toy, there are important considerations, common challenges, and expert tips that can help ensure your water bottle car is a success.
In this section, we’ll delve into these aspects to guide you through the building process.
Important Considerations During The Building Process
When building a water bottle car, there are several key points to keep in mind to ensure a smooth and successful construction:
- Design: Plan your car’s design in advance, considering factors such as weight, stability, and aerodynamics. A well-thought-out design can significantly impact the car’s performance.
- Materials: Choose the right materials for your water bottle car, including the type of bottle, wheels, axles, and any additional components. Lightweight and durable materials are generally preferred.
- Weight distribution: Pay attention to the weight distribution of your car. Balancing the weight evenly can enhance stability and prevent tipping during races.
- Testing and iteration: Test your car before the final build. Make any necessary adjustments and iterate on your design based on the results. This iterative process can help improve performance.
Common Challenges Faced When Building Water Bottle Cars
Building a water bottle car is not without its challenges.
Here are some common hurdles that builders often encounter:
- Leakage: Ensuring a watertight seal can be challenging, as water bottle cars rely on water pressure for propulsion. Leaks can significantly impact performance.
- Wheel alignment: Misaligned wheels can lead to unstable movement and increased friction. Proper alignment is crucial for optimal performance.
- Weight management: Striking the right balance between weight and stability can be tricky. Too much weight can slow the car down, while too little can make it unstable.
- Axle alignment: Improper axle alignment can impede the car’s movement or cause it to veer to one side. Precise alignment is essential for straight and smooth racing.
Expert Tips For A Successful Water Bottle Car Build
To enhance your chances of building a successful water bottle car, consider these expert tips:
- Streamline design: Create a sleek and aerodynamic design that minimizes air resistance. A well-streamlined car can achieve higher speeds.
- Friction reduction: Reduce friction by using smooth and polished axles and wheels. Lubricating these components can further decrease friction.
- Water pressure optimization: Experiment with different amounts of water to find the optimal pressure for maximum propulsion. Too little or too much water can affect performance.
- Ballast placement: Strategically place ballast weights to optimize weight distribution. Experiment with different positions to find the most effective configuration.
With these tips in mind, you’re now equipped with the knowledge to tackle the construction of a water bottle car.
Embrace the challenges, iterate on your design, and enjoy the process of building a successful water bottle car.
Can the Steps for Making a Water Bottle Car also be Applied to Making Plastic Water Bottle Sculptures?
When considering the process of making a water bottle car, the question arises whether the steps can be applied to making plastic water bottle sculptures. The intricate technique of making plastic water bottle sculptures requires a distinct set of skills and a creative approach. While both projects involve repurposing water bottles, the artistic aspect and structural considerations involved in making plastic water bottle sculptures necessitate a different approach altogether.
FAQ About How To Make Water Bottle Car
How Can I Make A Water Bottle Car?
To make a water bottle car, you will need a water bottle, four wheels, and a propulsion system like a balloon or rubber band.
What Materials Do I Need To Make A Water Bottle Car?
To make a water bottle car, you will need a water bottle, four wheels, axles, lightweight materials like cardboard or wood, and a propulsion system like a balloon or rubber band.
How Does A Water Bottle Car Work?
A water bottle car works by converting potential energy stored in the propulsion system, such as a balloon or rubber band, into kinetic energy that moves the car forward.
Can Kids Make A Water Bottle Car?
Yes, making a water bottle car can be a fun and educational project for kids to learn about basic physics and engineering concepts.
What Are The Benefits Of Making A Water Bottle Car?
Making a water bottle car is a great way to foster creativity, promote hands-on learning, and teach children about energy transfer and alternative sources of propulsion.
Conclusion
Remember, making a water bottle car is not only a fun diy project, but it also helps promote environmental sustainability.
By repurposing plastic bottles and using them as the main structure of the car, you are reducing waste and contributing to a cleaner planet.
This project teaches valuable skills such as problem-solving, innovation, and teamwork.
It’s a perfect activity for both children and adults who want to engage in a hands-on learning experience.
The materials required are easily accessible, making it a cost-effective option for those on a budget.
Get creative with paint and decorations to make your water bottle car unique and personalized.
So, gather your supplies, follow the steps outlined in this blog post, and enjoy the satisfaction of building your very own water bottle car while keeping the environment in mind.
Happy crafting!