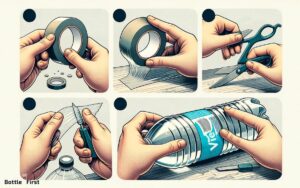
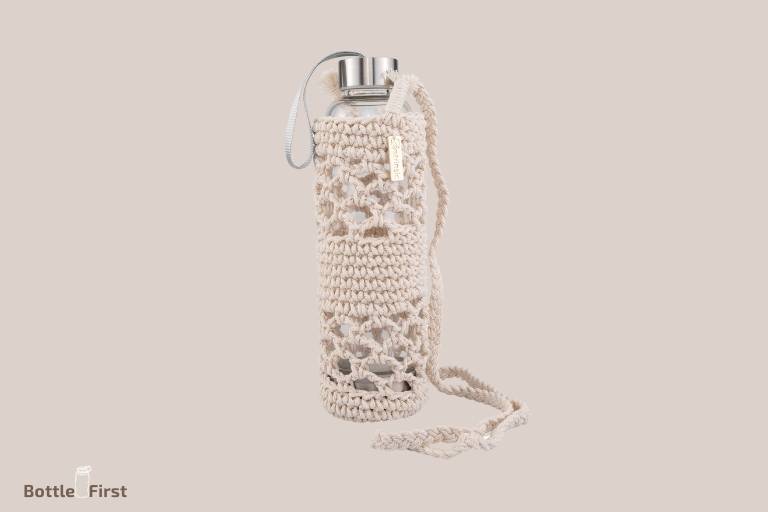
How to Make a Macrame Water Bottle Holder? 10 Easy Steps
To make a macrame water bottle holder, you will need a handful of materials and a few simple steps.
You will require macrame cord, a key ring, a water bottle for measurements, and scissors.
The steps involve measuring the macrame cord, attaching the cord to the keyring, creating square knots, and wrapping the bottle.
Macrame is a form of textile produced using knotting techniques. Making a macrame water bottle holder involves creating a series of square knots on a length of macrame cord attached to a key ring.
The cord is then wrapped around the water bottle and knotted to secure it in place.
The process is simple, even for beginners, and the result is a stylish, eco-friendly water bottle holder.
Creating a macrame water bottle holder isn’t just a fun DIY project; it’s also a practical solution. The holder can help protect your bottle and make it easier to carry around.
Plus, it’s an excellent way to personalize your item. With just a little bit of patience and some knotting skills, you can create your own stylish and eco-friendly water bottle holder.
10 Steps and Materials for Making a Macrame Water Bottle Holder
| Step Number | Materials Needed | Instructions |
|---|---|---|
| 1 | Macrame Cord, Ruler | Choose your macrame cord and measure and cut a 20-foot length. |
| 2 | Macrame Cord, Scissors | Fold your cord in half twice. You should be left with four strands. Cut the ends so all the strands are the same length. |
| 3 | Macrame Cord, Water Bottle | Next, begin braiding your strands together. Make sure it’s a tight braid and keep going until the braid is long enough to wrap around the base of your water bottle. |
| 4 | Macrame Cord, Water Bottle | Connect the braid to create a circle that fits perfectly at the base of your bottle. Use a square knot to secure. |
| 5 | Macrame Cord | From each end of the knot, leave a small gap and then tie another knot with each pair of strands. These knots will create a net-like structure that will hold your bottle in place. |
| 6 | Macrame Cord, Water Bottle | Continue tying knots, moving upwards and matching each knot to one on the opposite side, until you’ve reached a height that will hold your bottle securely. |
| 7 | Macrame Cord, Key Ring | To create the handle, divide the cords into two groups. Thread the first group through a key ring and tie a knot to secure. Repeat with the second group. |
| 8 | Macrame Cord | Braid the remaining cords together to form the handle. When you’ve reached your desired length, tie off the end with a secure knot. |
| 9 | Macrame Cord, Scissors | Trim any excess cord at the end of the handle. |
| 10 | Macrame Water Bottle Holder | Your macrame water bottle holder is now complete. It’s ready to use or give as a gift. |
Key Takeaway
Interesting Facts About Macrame Water Bottle Holders
Understanding The Basics Of Macrame
Macrame is a versatile craft that involves creating decorative knots to make various items, including water bottle holders.
If you’ve ever been curious about macrame or want to give it a try, this section will introduce you to the basics of this art form.
Let’s dive in!
Materials Needed For Macrame Water Bottle Holder
To get started with macrame, you’ll need a few essential materials.
Here’s a breakdown of what you’ll require:
- Macrame cord: Opt for a durable and sturdy cord, such as cotton or nylon, which will hold the weight of your water bottle securely.
- Scissors: A good pair of sharp scissors will come in handy for cutting the cord and trimming loose ends.
- Water bottle: Choose the water bottle you plan to use with your macrame holder. Consider the size and shape to ensure a proper fit.
- Measuring tape: This will help you determine the desired length of your cord and create precise measurements.
Introduction To Macrame Knots And Techniques
Macrame relies on various knots and techniques to create intricate patterns and designs.
Here are some key points to understand:
- Square knot: One of the fundamental knots used in macrame, the square knot involves crossing cords to create a square-shaped knot. It can be used alone or in combination with other knots.
- Half hitch: This knot consists of creating a loop with one cord and passing the end of another cord through it. It’s great for adding texture and depth to your macrame piece.
- Spiral knot: As the name suggests, this knot creates a spiral effect by twisting or rotating the cords. It adds a unique touch to your macrame designs.
- Lark’s head knot: This knot is used for attaching cords to a ring or dowel rod. It involves folding a cord in half and passing the loop through the ring, then pulling the cord ends through the loop.
- Macrame techniques: In addition to knots, macrame incorporates techniques like weaving, braiding, and wrapping cords to create interesting patterns and textures.
Recommended Macrame Cord Types And Sizes
Choosing the right macrame cord is crucial for creating a sturdy and visually appealing water bottle holder.
Consider the following factors:
- Cord type: Cotton cord is a popular choice for macrame due to its softness and flexibility. Nylon cord is also durable and suitable for outdoor use. Experiment with different materials to find the one that suits your preferences.
- Cord size: The size of the cord determines the thickness of your macrame knots. Thicker cords create bolder knots, while thinner cords result in more delicate patterns. Typically, 3-4 mm cords work well for most macrame projects.
- Color selection: Don’t be afraid to play with different colored cords to add personality and style to your water bottle holder. Mix and match hues that complement your bottle or reflect your personal taste.
Now that you have a grasp of the basics of macrame, such as the essential materials, knots, and cord types, you’re ready to embark on your macrame water bottle holder journey.
So gather your supplies, follow the instructions in our upcoming sections, and get creative with your macrame skills!
Getting Started: Preparing Your Workspace
Before diving into the exciting world of macrame and creating your own water bottle holder, it’s essential to have a well-prepared workspace.
Setting up your area correctly will help you work efficiently and comfortably, allowing your creativity to flow freely.
Here are a few key points to consider:
Choosing A Suitable Work Area For Macrame
- Find a space in your home or office with ample lighting. Natural light is ideal, but if that’s not possible, ensure you have good artificial lighting that won’t strain your eyes during the macrame process.
- Select an area with enough room for you to spread out your materials and move around comfortably. Macrame can require some arm movements, so having enough space to work is crucial.
Gathering Essential Tools And Materials
To get started on your macrame water bottle holder, gather the following tools and materials:
- Macrame cord: Choose a cord made from natural fibers like cotton or hemp. Ensure it is sturdy enough to hold the weight of a water bottle.
- Scissors: You’ll need a sharp pair of scissors to cut your cord cleanly and precisely.
- Tape measure: Having a tape measure handy will help you keep your macrame knots and measurements consistent.
- Water bottle: Before beginning your project, choose the water bottle you want to use with your water bottle holder. This will help you determine the appropriate measurements and ensure a perfect fit.
Setting Up Your Work Station For Maximum Comfort And Convenience
To ensure an enjoyable macrame experience, set up your work station with these tips in mind:
- Use a sturdy table or a flat surface to work on. Make sure it’s at a height comfortable for you to sit or stand for extended periods.
- Consider using a protective covering for your table to prevent any damage from scissors or cords.
- Have a comfortable chair or cushion nearby to provide support during your macrame sessions.
- Keep a small waste bin or bag nearby to dispose of any scraps or unwanted materials.
Remember, a well-prepared workspace sets the tone for a successful macrame project.
By following these tips and creating a comfortable environment, you’ll be ready to embark on your macrame water bottle holder journey with ease and creativity. So, let’s get started!
Step 1: Creating The Initial Loop
Before you dive into making your macrame water bottle holder, the first step is to create the initial loop. This loop will serve as the foundation for the entire project.
Here’s how to get started:
Measuring And Cutting The Macrame Cord
- Measure the length of macrame cord you’ll need. The length will depend on the size of your water bottle and how long you want the holder to be. As a general guideline, multiply the height of your water bottle by three, and add a few extra inches for the knotting.
- Once you have determined the length, cut the macrame cord using sharp scissors.
Folding The Cord To Form A Loop
- Take the macrame cord and fold it in half, creating a loop at the top with the two loose ends hanging down.
- Make sure the loop is large enough to comfortably fit your hand through, as this is where you will be carrying the water bottle.
Securing The Loop To Your Work Surface
- To keep the loop in place while you work on your macrame project, secure it to your work surface. This can be a table, chair, or any sturdy object.
- Use masking tape or binder clips to hold the loop securely. Make sure it is taut and doesn’t move around as you work.
Remember, the initial loop is the foundation of your macrame water bottle holder.
Once you have created it, you are ready to move on to the next steps of knotting and weaving to bring your holder to life. Stay tuned for step two in our blog post series!
Step 2: Tying The Square Knots
Learning The Square Knot Technique
To create a macrame water bottle holder, understanding the square knot technique is essential. This classic knotting technique consists of two opposing half-square knots, creating a square pattern.
Follow these steps to master the square knot technique:
- Begin by holding two strands of cord horizontally.
- Cross the left cord over the right cord, forming a loop.
- Bring the right cord over the left cord, passing it through the loop created on the left side.
- Tighten the knot by pulling both cords gently.
- Repeat the process, but this time cross the right cord over the left cord to create the second half of the square knot.
- Tighten the knot once more by pulling the cords.
Creating The First Row Of Square Knots
After learning the square knot technique, start crafting the first row of square knots for your macrame water bottle holder.
Follow these steps:
- Gather the desired number of cords.
- Fold each cord in half and attach them to a metal ring or base cord using lark’s head knots.
- Arrange the cords evenly and begin tying square knots following the technique mentioned earlier.
- Ensure each knot is tied with the same tension for a uniform look.
- Continue tying square knots until the first row reaches the desired length.
Adding Subsequent Rows To Achieve Desired Length
Once the initial row is complete, it’s time to add subsequent rows to achieve the desired length for your macrame water bottle holder.
Here’s how to do it:
- Divide the cords into pairs, combining the outer cords of each neighboring pair.
- Tie a square knot using the outer cords of the first pair.
- Move on to the next pair of cords and repeat the square knotting process.
- Continue working your way across the row, knotting each pair of outer cords.
- Once the row is complete, repeat the process for subsequent rows until you reach the desired length.
- Remember to maintain consistent tension and ensure each square knot aligns with the knots in the row above.
By following these steps, you’ll be able to tie square knots with ease, create the first row, and add subsequent rows to achieve the desired length for your macrame water bottle holder.
Let your creativity flourish as you explore different patterns and techniques to personalize your design.
Step 3: Incorporating Beads (Optional)
Beads can add a touch of personalization and charm to your macrame water bottle holder.
Whether you want to create a bohemian vibe or simply enhance the overall design, selecting the right beads will make a noticeable difference.
Here’s how you can incorporate beads into your water bottle holder:
Choosing The Right Beads For Your Water Bottle Holder
When it comes to choosing beads, consider the following factors:
- Size: Opt for beads that are not too large to fit through the knots easily, but also not too small that they go unnoticed.
- Material: There is a wide variety of bead materials available, from wooden beads to glass beads. Choose the material that complements your overall design vision.
- Color: Select beads that either match the color scheme of your water bottle holder or add a pop of contrast to create visual interest.
Adding Beads To Enhance The Design And Aesthetic Appeal
By incorporating beads, you can elevate the design and visual appeal of your macrame water bottle holder.
Here’s how you can do it:
- Stringing beads: Before you start knotting, thread your beads onto the cords. Make sure to leave enough cord length on both ends for the knots.
- Placement: Determine where you want to position the beads – it could be at regular intervals or sporadically throughout the holder. Experiment with different arrangements to find the look you prefer.
- Knotting with beads: Once you have your beads in position, proceed with your square knotting technique, ensuring the beads are secure within the knots.
Remember to space the beads evenly and consider the overall length of your water bottle holder. You don’t want it to be too long or too short once the beads are incorporated.
Integrating Beads Between The Square Knots
To achieve a balanced and cohesive look, follow these steps to integrate beads between the square knots:
- Start by creating a square knot as you normally would.
- Before tightening the knot completely, slide a bead onto one of the cords.
- Continue with the second half of the square knot, ensuring the bead is held snugly in place.
- Repeat this process, alternating the cords where you place the beads, until you reach the desired number of beads or the end of the water bottle holder.
By incorporating beads between the square knots, you’ll create an eye-catching pattern and add depth to the overall design.
Let Your Creativity Shine
Integrating beads into your macrame water bottle holder is a wonderful way to showcase your creativity while adding a personal touch.
Experiment with different bead sizes, materials, and placements to achieve the perfect aesthetic appeal.
Remember to have fun throughout the process and embrace the opportunity to make your water bottle holder uniquely yours.
Step 4: Forming The Bottle Holder Structure
Now that you have the basic foundation of your macrame water bottle holder, it’s time to shape the cords to fit the bottle form and create a sturdy structure.
Follow these steps to ensure a functional and visually appealing holder design.
Shaping The Macrame Cords To Fit The Bottle Form
- Measure the circumference of your water bottle using a flexible measuring tape.
- Cut eight cords twice the length of your desired finished holder plus an additional foot for tying knots.
- Fold the cords in half and attach them to the wooden dowel using a lark’s head knot.
- Divide the cords into four groups of four, with each group containing two adjacent cords from the two neighboring groups.
- Take the outer left cord from the left group, cross it over the adjacent cords, and pass it through the loop formed by the adjacent right cord.
- Repeat this process with the outer right cord from the right group, crossing it over the adjacent cords and passing it through the loop formed by the adjacent left cord.
- Continue this pattern, alternating between left and right sides, until you have reached the desired length for the base of your holder.
- Secure the base by tying a square knot at the bottom of the cords.
Utilizing Specific Knot Patterns To Create The Structure
- Choose a knot pattern that complements the design of your water bottle holder. Common options include the square knot, double half hitch knot, and spiral knot.
- Begin the pattern by working one row at a time. Follow the instructions for each knot carefully, ensuring the cords are properly arranged.
- Repeat the knot pattern for multiple rows until you reach the desired height of your water bottle holder.
- Regularly adjust the tension of the knots to maintain an even and tight structure.
Establishing A Sturdy And Functional Holder Design
- To add extra stability, incorporate additional knots such as the double square knot or diagonal clove hitch knot at strategic points along the holder.
- Ensure that the knots are pulled tightly to prevent sagging or slipping.
- Check the dimensions of the bottle holder periodically to ensure it fits snugly around your water bottle without being too tight.
- Test the strength of the holder by gently lifting and shaking the water bottle. Make any necessary adjustments to reinforce weak spots or improve stability.
- Trim excess cord length and tidy up loose ends by neatly knotting or gluing them for a clean finish.
Remember, practice makes perfect. Don’t be discouraged if your first attempt doesn’t turn out perfectly.
Adjustments can always be made along the way to create a functional and aesthetically pleasing macrame water bottle holder.
Enjoy the process and the satisfaction of crafting your very own personalized holder!
Step 5: Finishing And Securing The Ends
Now that you’ve completed the main part of your macrame water bottle holder, it’s time to focus on finishing up the ends and ensuring the durability of your creation.
This step will help give your holder a polished look and prevent any unraveling in the future.
Trimming Excess Cords And Achieving A Neat Finish
To achieve a neat and professional finish, follow these steps:
- Start by trimming any excess cords. Use sharp scissors to carefully cut the cords, making sure to leave a small tail of about 1 inch.
- To prevent fraying, apply a small amount of fabric glue or clear nail polish to the cut ends of the cords. This will serve as a seal and keep the ends from unraveling over time.
Securing The Ends To Prevent Unraveling
To ensure that your macrame water bottle holder stays intact, it’s important to secure the ends properly.
Here’s how you can do it:
- Take the cords at the ends of your holder and tie them together in a knot. Make sure the knot is tight and secure.
- Once you’ve tied the initial knot, you can add an additional knot or even a few more for extra security. This will help prevent any accidental unraveling and keep your water bottle safe.
Adding Additional Decorative Elements If Desired
If you want to personalize your macrame water bottle holder even further, you can add some additional decorative elements.
Here are some ideas to get you started:
- Attach beads, charms, or small pendants to the cords of your holder. This will add an extra touch of style and uniqueness to your creation.
- Incorporate different colors of cords or experiment with different knotting techniques to create interesting patterns and designs.
- Consider adding tassels or feathers at the bottom of your holder for a bohemian vibe.
Remember, the choice to add additional decorations is entirely up to you. Have fun with it and let your creativity shine!
By following these steps, you’ll be able to finish your macrame water bottle holder with a clean and professional look.
The secure ends will ensure that your holder stays intact, and adding extra decorative elements will give it a personal touch.
Now it’s time to proudly display your handmade creation and enjoy the convenience of having a stylish water bottle holder at your side. Happy crafting!
Conclusion: Show Off Your Newly Crafted Macrame Water Bottle Holder
Emphasizing The Versatility Of Macrame Projects
Macrame is a versatile art form that allows you to create stunning and functional pieces with just a few knots and cords.
Whether you’re a beginner or an experienced crafter, macrame offers endless possibilities for creativity.
Here are some key points to emphasize the versatility of macrame projects:
- Macrame can be used to create a wide range of items, from plant hangers and wall hangings to jewelry and bags. The possibilities are truly limitless, and you can let your imagination run wild with various designs.
- Macrame projects can be customized to suit your personal style and preferences. You can choose different types of cords, experiment with various knotting techniques, and incorporate different colors and textures to create a unique and one-of-a-kind piece.
- Macrame is a great way to add a touch of bohemian charm to your home decor. From a macrame curtain to a decorative lampshade, macrame pieces can instantly elevate the aesthetic of any space.
- Macrame offers a sense of fulfillment and satisfaction as you witness your creation taking shape. The process of knotting and weaving can be therapeutic, providing a much-needed escape from the demands of everyday life.
- Macrame projects make great gifts for friends and loved ones. You can create personalized macrame keychains, dreamcatchers, or even a water bottle holder, showcasing your love and thoughtfulness.
Showcase Your Unique Design And Creativity
One of the most exciting aspects of macrame is the opportunity to showcase your own unique design and creativity.
Here are some key points on how you can let your imagination shine through your macrame projects:
- Experiment with different knotting techniques and patterns to create a design that is truly your own. Mix and match different types of knots, such as square knots, half knots, and spiral knots, to create interesting textures and patterns.
- Incorporate beads, charms, and other embellishments into your macrame projects to add a personal touch. These small details can make a big difference and make your design stand out.
- Don’t be afraid to play with color and mix different shades of cords to create a vibrant and eye-catching piece. You can also experiment with ombré effects or gradients to add depth and dimension to your macrame creations.
- Learn from other macrame artists and draw inspiration from their work, but always put your own spin on it. Take elements from different designs and combine them to create something entirely new and unique.
- Share your macrame creations on social media or participate in local craft fairs and exhibitions to showcase your talent. Not only will this give you the opportunity to receive feedback and appreciation for your work, but it may also inspire others to give macrame a try.
Encouraging Further Exploration And Experimentation With Macrame
Macrame is an art form that continues to evolve and grow, offering endless possibilities for exploration and experimentation.
Here are some key points to encourage you to push the boundaries and dive deeper into the world of macrame:
- Take on more challenging macrame projects as you gain confidence and experience. Try your hand at creating intricate wall tapestries or large-scale macrame installations. Pushing yourself beyond your comfort zone will help you discover new techniques and expand your creativity.
- Join online macrame communities and forums to connect with other macrame enthusiasts and learn from their experiences. Share your own knowledge and seek guidance on advanced techniques or troubleshooting common macrame challenges.
- Explore different materials beyond traditional cords, such as leather, fabric strips, or even unconventional materials like recycled clothing or plastic bags. This experimentation can lead to unique and unexpected results that set your macrame projects apart.
- Consider incorporating macrame into other crafts and disciplines. For example, you can combine macrame with woodworking to create a macrame hammock chair, or fuse macrame with jewelry-making techniques to design intricate macrame earrings or bracelets.
- Never stop learning and growing in your macrame journey. Attend workshops, read books, watch tutorials, and invest in quality materials to continually enhance your skills and broaden your horizons.
With its versatility, potential for unique designs, and opportunities for exploration, macrame is a captivating craft that allows you to unleash your creativity.
So, pick up your cords, let your imagination run wild, and create a macrame water bottle holder that reflects your individual style and artistic flair!
Are There Any Differences Between the Two Macrame Water Bottle Holder Tutorials?
The two macrame water bottle holder tutorials have distinct approaches. The first tutorial focuses on a simpler macrame water bottle holder step-by-step method, ideal for beginners. The second tutorial offers a more intricate design, involving advanced knots and patterns. Depending on your skill level and preference, you can choose the tutorial that suits you best.
FAQ About How To Make A Macrame Water Bottle Holder
How Do You Make A Macrame Water Bottle Holder?
To make a macrame water bottle holder, you can follow these easy steps.
What Materials Do You Need To Make A Macrame Water Bottle Holder?
You will need cord, a water bottle, scissors, and a macrame ring or carabiner.
Are Macrame Water Bottle Holders Adjustable In Length?
Yes, macrame water bottle holders can be easily adjusted to your desired length.
Can I Use Different Colors Of Cord To Make A Macrame Water Bottle Holder?
Absolutely! Using different colors of cord can add a fun and unique touch to your macrame water bottle holder.
How Long Does It Take To Make A Macrame Water Bottle Holder?
The time it takes to make a macrame water bottle holder depends on your skill level, but it can typically be completed in a few hours.
Conclusion
Creating your own macrame water bottle holder is both a practical and creative way to accessorize your everyday carry.
With just a few simple knots and basic supplies, you can have a stylish and functional holder that keeps your water bottle easily accessible wherever you go.
Not only is macrame a trendy craft, but it also allows you to personalize your holder to match your own unique style.
From vibrant colors to intricate patterns, the possibilities are endless. Whether you’re a seasoned macrame expert or a beginner looking to try out a new hobby, making a macrame water bottle holder is a fun and rewarding project.
So grab your favorite cord and get started on creating your very own macrame masterpiece! Happy crafting!