How to Put Name on Water Bottle? 8 Easy & Quick Steps
Personalizing a water bottle with your name can be done in numerous methods such as using vinyl decals, embossing, engraving, marker writing, or printable labels.
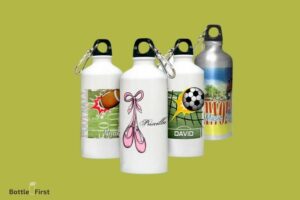
Putting your name on a water bottle can add a personal touch and ensure your water bottle does not get mixed up with others. A popular method is using vinyl decals because of their durability and water resistance.
You can also engrave your name directly on the bottle if it’s made of metal or glass, or use a permanent marker if the bottle is plastic. Printable labels are also an option if you want an easy and quick solution.
Using each of these methods, you can personalize your water bottle to stand out or simply to ensure it doesn’t get lost or mixed up with other bottles. You can go with a simple name design or add additional elements like symbols, patterns, or images for a more unique look. Remember, the goal here is not just to put your name on the bottle, but to do it in a way that reflects your personal style.
8 Steps to Personalize a Water Bottle
| Steps | Description |
|---|---|
| Step 1 | Gather Materials – You will need a water bottle, permanent marker or bottle-safe paint, and a stencil if desired. |
| Step 2 | Choose Placement – Decide where on the bottle you want the name to be. |
| Step 3 | Create Stencil – If you are using a stencil, create one with the name you want to use. |
| Step 4 | Draw or Paint Name – Using your permanent marker or paint, write the name on the bottle. If you’re using a stencil, place it on the desired area and fill it in with your marker or paint. |
| Step 5 | Let Dry – Allow the marker or paint to fully dry before touching or using the bottle. |
| Step 6 | Seal (Optional) – For added longevity, consider sealing the name with a clear, waterproof sealant. |
| Step 7 | Clean-up – Clean up your work area and dispose of any waste. |
| Step 8 | Enjoy – Now you have a personalized water bottle! |
Key Takeaway
Five Facts About Put Name On Water Bottle
Choosing The Right Water Bottle For Personalization
Consider The Material, Size, And Shape
When it comes to personalizing your water bottle, it’s important to start with the right bottle that suits your needs.
Here are a few key points to consider when choosing a water bottle for personalization:
- Material: Opt for a water bottle made from a material that is suitable for personalization. Some common options include stainless steel, plastic, and glass. Each material has its own pros and cons, so it’s important to choose one that fits your lifestyle and preferences. Stainless steel is durable and long-lasting, plastic is lightweight and affordable, while glass provides a more eco-friendly option.
- Size: Consider the size of the water bottle you need. Are you looking for a bottle that can hold a small amount of water for short trips, or do you need a larger one for all-day hydration? Keep in mind that larger bottles may be more cumbersome to carry, so it’s important to find the right balance between capacity and convenience.
- Shape: Water bottles come in various shapes, from the classic cylindrical design to more ergonomic and unique shapes. Think about how the bottle will fit in your bag or cup holder, and consider any specific requirements you may have. For example, if you enjoy outdoor activities, a bottle with a carabiner clip or a slim design may be more suitable.
When choosing a water bottle for personalization, it’s important to opt for one that meets your material preferences, size requirements, and shape preferences.
The right bottle will serve as a blank canvas for your personal touch. So, keep these key points in mind and get ready to put your name on a water bottle that suits your style.
Preparing The Water Bottle For Personalization
Before you put your name on a water bottle, it’s important to prepare the surface properly. By following these simple steps, you can ensure that your personalization is long-lasting and looks great.
Let’s dive in!
- Clean the bottle thoroughly: Before applying any stickers or labels, make sure to clean the water bottle thoroughly. This will remove any dirt, dust, or residue that may interfere with the adhesion of your personalization. Use warm soapy water and a gentle brush to scrub the bottle inside and out. Rinse it well with clean water and pat dry with a clean towel.
- Ensure the surface is dry and free of debris: Once you’ve cleaned the bottle, it’s important to ensure that the surface is completely dry before proceeding. Any moisture left on the bottle can prevent stickers or labels from sticking properly. Use a clean, dry cloth or towel to remove any excess water and let the bottle air dry for a few minutes. Also, make sure there are no debris or particles left on the surface that can affect the adhesion.
- Choose the right type of personalization: Depending on your preferences, there are various ways to put your name on a water bottle. You can use vinyl decals, waterproof markers, custom labels, or even etching. Consider the material of your water bottle and the durability of the personalization method you choose. For example, vinyl decals tend to be long-lasting and can withstand washing, while markers may require more frequent touch-ups.
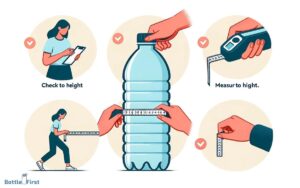
- Measure and position the personalization: Before applying any permanent personalization, it’s a good idea to measure and position it correctly. Use a ruler or measuring tape to determine the desired size and location of your name or design. Mark the spot lightly with a pencil or masking tape, ensuring that it’s centered and aligned as per your liking. This step will help you achieve an accurate and professional-looking result.
- Apply the personalization carefully: Now that you’ve prepared the water bottle and decided on the positioning, it’s time to apply the personalization. If you’re using vinyl decals or custom labels, carefully peel off the backing and place them on the bottle while applying slight pressure to ensure proper adhesion. If you’re using markers, make sure to use smooth, consistent strokes for clean lettering or designs. Take your time and be patient to achieve the desired outcome.
- Allow the personalization to set: After applying the personalization, it’s crucial to let it set properly. Follow the manufacturer’s recommendations for drying or curing time if you’re using vinyl decals, labels, or markers. This will help to ensure that the personalization stays intact and doesn’t get damaged or smudged. Avoid touching or washing the water bottle until the personalization is fully set.
Remember, personalizing a water bottle adds a unique touch and helps to distinguish it from others.
By properly preparing the bottle and following these steps, you can create a customized water bottle that reflects your style and personality.
Enjoy your one-of-a-kind hydration companion wherever you go!
Different Methods Of Putting Names On A Water Bottle
Finding ways to personalize everyday items has become increasingly popular, and one item that many people like to put their names on is their water bottle. This not only adds a personal touch but also helps to avoid mix-ups or confusion.
There are several methods you can use to put your name on a water bottle, including vinyl decals, paint markers, and etching techniques. Let’s take a closer look at each method.
Using Vinyl Decals:
- Vinyl decals are a popular choice for personalizing water bottles as they are easy to apply and come in various designs and fonts.
- Begin by cleaning the surface of the water bottle to ensure the decal adheres properly.
- Measure where you want the decal to go and mark the placement lightly with a pencil.
- Peel the backing off the vinyl decal and carefully place it on the water bottle, starting from one end and smoothing it down to eliminate any air bubbles.
- Once applied, press firmly and evenly to ensure a good bond with the water bottle.
- If desired, you can further protect the vinyl decal by applying a layer of clear sealant.
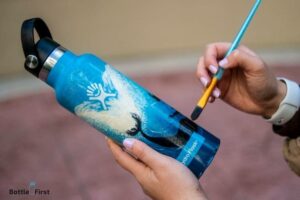
Customizing With Paint Markers:
- Paint markers offer a more handcrafted and artistic approach to personalizing water bottles.
- Start by choosing a paint marker in the desired color or colors.
- Clean the surface of the water bottle to ensure the paint adheres properly.
- Sketch out your design or simply write your name lightly with a pencil as a guide.
- Using the paint markers, carefully trace over the pencil marks or create your design directly on the water bottle.
- Allow the paint to dry completely before using the water bottle.
- For added protection, you can consider applying a clear coat over the painted design.
Engaging In Etching Techniques:
- Etching can provide a more permanent and professional look to a personalized water bottle.
- Choose a design or create a stencil of your name.
- Clean the surface of the water bottle thoroughly.
- Apply the stencil securely to the desired area of the bottle.
- Put on protective gloves and goggles to ensure safety.
- Using an etching cream or solution, carefully apply it to the exposed glass area of the stencil.
- Follow the instructions provided by the manufacturer for the recommended duration of time to leave the etching cream on.
- Once the time is up, rinse off the cream and remove the stencil, revealing your personalized etched design.
- Clean the water bottle once more before use.
Personalizing a water bottle with your name can be a creative and fun way to make it truly your own.
Whether you prefer the simplicity of vinyl decals, the artistic touch of paint markers, or the professional look of etching, there are various methods to choose from.
Select the one that best suits your style and get ready to enjoy a water bottle that truly stands out.
Step-By-Step Guide: Putting Your Name On A Water Bottle
Have you ever struggled to keep track of your water bottle in a busy gym or crowded office? Personalizing your water bottle with your name is a simple and effective solution to this problem.
Not only will it help you identify your bottle easily, but it will also add a unique touch to your hydration companion.
In this step-by-step guide, we will walk you through the process of putting your name on a water bottle. Let’s get started!
Design Your Name Or Desired Text:
Before you start transferring your name onto the water bottle, it’s important to decide on the design and font you want to use.
Here are a few key points to consider:
- Choose a font that is clear and legible, ensuring that your name stands out on the bottle.
- Experiment with different styles and sizes to find the perfect fit for your personalization.
- Consider adding additional elements like symbols or patterns to make your name even more unique.
Transfer The Design Onto The Bottle:
Once you have finalized your design, it’s time to transfer it onto the water bottle.
Here’s how you can do it:
- Clean the surface of the bottle thoroughly to ensure proper adhesion.
- Use a pencil to lightly trace your design onto the bottle. This will act as a guide for the next step.
- Alternatively, you can create a stencil of your design and use it to trace the outline onto the bottle using a marker or a paint pen.
Apply The Chosen Personalization Method:
Now that you have the design on the water bottle, it’s time to apply the personalization method you have chosen.
Here are a few popular methods you can try:
- Vinyl decals: Cut out your design from a sheet of vinyl and carefully apply it to the bottle, ensuring there are no air bubbles. Press firmly to make sure it adheres properly.
- Permanent markers: Use permanent markers in the desired colors to handwrite your name directly onto the bottle. Allow the ink to dry completely before handling.
- Laser engraving: If you want a professional-looking and long-lasting personalization, consider getting your water bottle laser-engraved. This method ensures durability and precision.
Remember to follow the instructions specific to each personalization method for the best results. Once your name is on the water bottle, you can proudly carry it wherever you go, knowing that it’s uniquely yours.
Putting your name on a water bottle is not only functional but also adds a touch of personality to your everyday hydration.
Follow these simple steps, get creative with your design, and enjoy the benefits of having your own customized water bottle.
Stay hydrated in style!
Maintaining And Caring For Your Personalized Water Bottle
Owning a personalized water bottle not only allows you to stay hydrated throughout the day but also adds a touch of personal style to your daily routine.
However, to ensure the longevity and cleanliness of your water bottle, it’s essential to properly maintain and care for it.
Here are some key points to keep in mind:
Regularly Clean And Dry The Bottle
- Clean your water bottle after each use to prevent the buildup of bacteria and other contaminants.
- Use warm soapy water and a bottle brush to thoroughly clean the inside of the bottle, paying extra attention to areas that are difficult to reach.
- Rinse the bottle thoroughly to remove any soap residue, and allow it to air dry completely before using it again.
Avoid Using Abrasive Cleaners Or Materials
- While it may be tempting to use abrasive cleaners or materials to remove stubborn stains from your water bottle, it’s crucial to avoid doing so.
- Abrasive cleaners can scratch the surface of the bottle, causing damage and providing a breeding ground for bacteria.
- Instead, opt for gentle cleaning solutions, such as a mixture of baking soda and water, to safely remove stains without harming the bottle.
Properly Store The Bottle To Prevent Damage
- When not in use, store your personalized water bottle in a clean and dry place, away from direct sunlight.
- Avoid placing it near sharp objects or in areas where it could be easily knocked over, as this may result in scratches or dents.
- If your bottle has a cap or lid, make sure it is fully closed to prevent any unwanted spills or leakage.
Remember, by following these simple maintenance and care tips, you can enjoy the benefits of using your personalized water bottle for a long time while ensuring it stays clean and in good condition.
What is the Difference Between Putting a Name on a Stainless Steel Water Bottle and a Regular Water Bottle?
When it comes to personalization, there is a stark contrast between putting a name on a stainless steel water bottle and a regular water bottle. The stainless steel water bottle personalization guide offers insights on customization techniques suitable for stainless steel bottles, whereas regular water bottles may require different methods altogether. It’s crucial to consider the material’s properties and select appropriate techniques to ensure a lasting and visually-appealing personalization.
FAQ About Put Name On Water Bottle
How Can I Personalize My Water Bottle?
To personalize your water bottle, you can use various methods such as stickers, decals, engraving, or customizing it with your name using permanent markers.
What Are Some Creative Ideas For Labeling A Water Bottle?
You can get creative by using colorful vinyl labels, using your favorite quotes or motivational words, or even using themed stickers or decals to give your water bottle a unique and personalized touch.
Are There Any Specific Markers For Writing Names On Water Bottles?
Yes, there are markers specifically designed for writing on water bottles. Look for markers labeled as waterproof, permanent, or suitable for use on plastic surfaces.
Can I Put My Name On A Stainless Steel Water Bottle?
Certainly! Stainless steel water bottles can be personalized by using vinyl decals, engraving, or even by attaching a custom-made name tag or label.
How Do I Ensure That The Name On My Water Bottle Doesn’T Fade Or Come Off?
To prevent fading or the name coming off, make sure to clean your water bottle gently and avoid using abrasive cleaners.
Additionally, hand wash your bottle instead of putting it in the dishwasher, and avoid excessive rubbing or scratching on the name area.
Conclusion
Personalizing your water bottle by putting your name on it not only adds a touch of individuality, but also helps prevent mix-ups or confusion. In this blog post, we’ve discussed various methods and creative ideas for putting your name on a water bottle.
From using labels and stickers to permanent markers and engraving, there are numerous options to suit your preferences and needs.
Additionally, we explored the benefits of personalizing your water bottle, such as promoting eco-friendly habits and reducing plastic waste. Remember to consider durability, readability, and aesthetics when choosing your preferred method.
Whether you’re on-the-go, at the gym, or in the office, having your name on your water bottle ensures it remains uniquely yours.
So don’t hesitate to get creative and make your water bottle stand out from the crowd! Explore the endless possibilities and enjoy the benefits of having a personalized water bottle today.