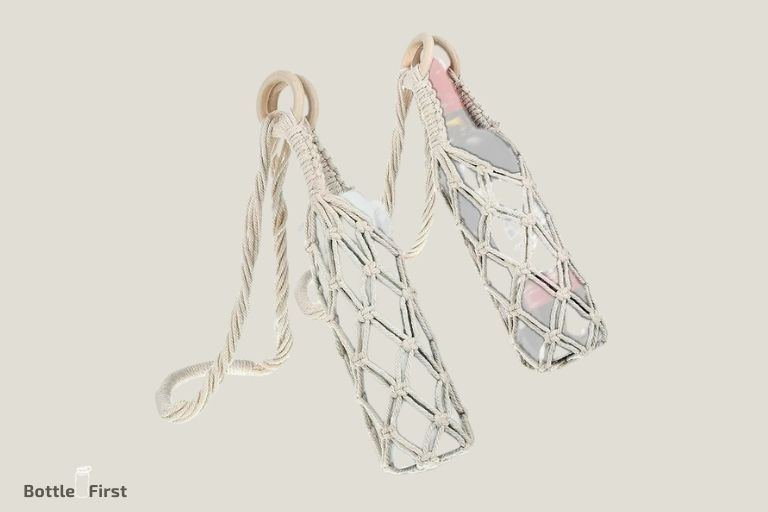
Macrame Water Bottle Holder Diy: 8 Easy & Quick Steps!
Macrame water bottle holders are an easy and stylish way to carry your water bottle. This handcrafted accessory can be made from different kinds of cord or twine, and decorated with various kinds of knots and beads to add personal flair.
Macrame is a form of textile-making using knotting rather than weaving or knitting. The craft is enjoying a revival, with many appreciating the process and the unique, handmade results.
Making a macrame water bottle holder involves creating a series of knots and loops around a bottle. This creates a secure and stylish holder that is both practical and aesthetically pleasing.
The beauty of macrame is that it’s highly customizable. You can use any type of cord, from natural hemp to colorful nylon, and you can experiment with different knots, patterns, and bead placements.
This allows you to make a macrame water bottle holder that is completely unique and reflects your personal style. Plus, it’s a cost-effective and eco-friendly way to carry your water bottle.
8 Steps: DIY Macrame Water Bottle Holder
| Step Number | Materials Needed | Instructions |
|---|---|---|
| 1 | Macrame cord, 2 Rings | Cut 8 pieces of macrame cord 2 meters long each. Attach the cords to one ring using a larks head knot. |
| 2 | Macrame cord | Separate the cords into 4 pairs. Each pair should have 2 cords. |
| 3 | Macrame cord | Tie one square knot on each pair of cords. You should have 4 square knots in total. |
| 4 | Macrame cord | Take two cords from neighboring pairs and tie a square knot below the previous knots to create a diamond shape. Do this on all pairs. |
| 5 | Macrame cord | Repeat the above step to create another row of diamond shapes. Continue this pattern until your holder is long enough to hold a water bottle. |
| 6 | Macrame cord, 1 Ring | Thread all the cords through the other ring and secure by tying a gathering knot. |
| 7 | Scissors | Trim the excess cord to your desired length. |
| 8 | Water bottle | Insert your water bottle into your new macrame holder. |
Key Takeaway
Five Facts About: Macrame Water Bottle Holders
Materials Needed
To create your own macrame water bottle holder, you will need the following materials:
- Macrame cord: Choose a sturdy and lightweight cord for your water bottle holder. This will provide the necessary strength and durability.
- Wooden beads: Opt for beads that complement the color scheme of your cord and add a decorative touch to your macrame holder.
- Scissors: Have a reliable pair of scissors handy to cut the cord and trim any excess material.
- Tape measure: Use a tape measure to ensure accurate measurements while creating your macrame water bottle holder.
- Metal ring: The metal ring will serve as the foundation of your macrame holder and help in attaching it securely to your water bottle.
Now that you have gathered all the necessary materials, let’s move on to the next step – creating the knot patterns for your macrame water bottle holder.
Choosing The Right Cord And Beads
Understanding Different Types Of Macrame Cord
Macrame cords come in a wide array of materials and thicknesses. Understanding the different types of macrame cord available is crucial to choosing the right one for your water bottle holder diy project.
Here are the key points to consider:
- Cotton cord: Cotton is the most popular material for macrame cords. It is soft, easy to handle, and comes in various thicknesses. Opt for 100% natural cotton cord for an eco-friendly choice.
- Jute cord: Jute is a natural fiber that provides a rustic and earthy look to your water bottle holder. It is sturdy and ideal for outdoor use.
- Nylon cord: If you’re looking for a durable and strong option, nylon cord is the way to go. It is resistant to stretching, which ensures your water bottle holder will maintain its shape over time.
- Hemp cord: Hemp cord is another natural option that offers strength and durability. It has a rougher texture compared to other cords, perfect for adding texture to your macrame design.
- Macrame rope: Macrame rope is a thicker variation of cord, typically used for larger projects. It adds a bold and chunky look to your water bottle holder.
Selecting Appropriate Thickness And Texture
The thickness and texture of your macrame cord play a significant role in the overall appearance and function of your water bottle holder.
Here’s what you need to consider:
- Thin cord (1-3mm): Thin cords are ideal for intricate and delicate designs. They work well for creating intricate knots and detailed patterns.
- Medium cord (4-6mm): Medium cords strike a balance between durability and flexibility. They are versatile and suitable for most macrame projects, including water bottle holders.
- Thick cord (7mm+): Thick cords add a chunky and substantial look to your water bottle holder. They are ideal for creating a bold and statement piece.
- Smooth texture: Smooth cords create a neat and polished look for a modern water bottle holder design.
- Textured/spiral texture: Textured cords add visual interest and dimension to your water bottle holder. They can create a bohemian or rustic vibe.
Choosing Complementary Wooden Beads
Wooden beads are a lovely addition to your macrame water bottle holder, providing a natural and organic touch.
To choose the right wooden beads, consider the following:
- Size: Select beads that are proportionate to your cord thickness. Smaller beads work well with thinner cords, while larger beads complement thicker cords.
- Shape: Experiment with different bead shapes like round, faceted, or geometric to add visual interest to your water bottle holder.
- Color: Wooden beads come in an array of natural tones, such as light or dark wood. Choose colors that complement your cord or water bottle for a cohesive look.
- Finishes: Consider beads with a natural or polished finish to match the aesthetic of your water bottle holder.
- Patterns: Some wooden beads have carved or engraved patterns, adding a unique element to your macrame design.
Now that you understand the different types of macrame cord, how to select the appropriate thickness and texture, and choose complementary wooden beads, you’re well-equipped to create a stunning diy water bottle holder.
Let your creativity flow and enjoy the process of making a unique and functional accessory.
Measuring And Cutting The Cord
Determining The Desired Length Of The Water Bottle Holder
Before diving into creating a macrame water bottle holder, it’s important to determine the desired length. This will ensure a perfect fit for your specific water bottle.
Here are a few key points to keep in mind:
- Consider the length of the bottle: Measure your water bottle from the base to the neck. This will give you an idea of how long your holder needs to be to accommodate the entire length of the bottle.
- Think about where you want the holder to hang: Decide if you want your water bottle holder to hang at your waist, hip, or even cross-body. This will determine the length needed for a comfortable and convenient fit.
- Consider your personal style: If you prefer a shorter or longer water bottle holder, take your personal style into account. Some people prefer a shorter holder that keeps the bottle higher up, while others enjoy a longer holder that allows the bottle to hang lower.
- Take into account any additional design elements: If you plan on adding decorative knots or beads to your water bottle holder, consider adding a few extra inches to the length to ensure there is enough room for these elements.
Calculating The Cord Length Based On The Desired Design And Knotting Pattern
Once you have determined the desired length of your water bottle holder, it’s time to calculate the required cord length based on your chosen design and knotting pattern.
Here are the key points to consider:
- Measure the cord for each section: Break down your design into sections and measure the length of cord needed for each section. This will help you estimate the total cord length required.
- Account for knotting and looping: Keep in mind that knotting and looping will use up some length of the cord. Take this into consideration when calculating the cord length needed for each section.
- Consider any additional decorative elements: If you plan on incorporating additional decorative elements like beads, make sure to account for their length in your cord calculations.
- Add a buffer: It’s always a good idea to add a few extra inches to your cord length calculations. This will give you some room for error and ensure you have enough cord to work with.
Making Clean Cuts To Ensure An Even Finish
When working with cord for your macrame water bottle holder, it’s important to make clean cuts to ensure a neat and even finish.
Here’s how you can achieve this:
- Use sharp scissors or cord cutters: Invest in a good pair of sharp scissors or cord cutters specifically designed for cutting macrame cord. Dull blades can result in frayed or uneven cuts.
- Measure and mark your cuts: Before making any cuts, measure and mark the desired length on the cord. This will help you maintain consistency throughout your project.
- Hold the cord firmly: Make sure to hold the cord firmly and securely while cutting. This will prevent the cord from slipping or moving, resulting in a clean cut.
- Cut in one swift motion: When cutting the cord, make a clean cut in one swift motion. Avoid sawing or fraying the cord by using multiple cutting actions.
- Check the cut ends: After cutting, inspect the cut ends of the cord. If there are any frayed or uneven sections, trim them with a sharp pair of scissors to ensure a clean finish.
Remember, taking the time to measure and cut the cord accurately will result in a professional-looking macrame water bottle holder that you can be proud of.
Creating The Macrame Knots
Macrame, the art of knotting cords to create decorative patterns, has gained popularity in recent years. One of the most versatile and practical macrame projects you can try is a water bottle holder.
Not only does it add a touch of boho-chic to your style, but it also keeps your hands free while on the go.
In this section, we will explore the essential macrame knots to create your very own water bottle holder.
Introducing The Basic Macrame Knots – Square Knot, Half Square Knot, And Lark’S Head Knot
Before we dive into creating the macrame water bottle holder, let’s familiarize ourselves with the basic knots used in macrame. These knots form the foundation of most macrame designs and are essential to mastering the craft.
Here are the key points to remember about each knot:
Square knot:
- The square knot is a fundamental macrame knot formed by crossing two sets of cords.
- To create a square knot, cross the left cord over the center cords and under the right cord. Then, take the right cord and cross it over the center cords and through the loop created by the left cord.
- Repeat the process in reverse by starting with the right cord crossing over the center cords and under the left cord. Then, take the left cord and cross it over the center cords and through the loop created by the right cord.
- Tighten the knot by pulling both cords firmly.
Half square knot:
- The half square knot is similar to the square knot but involves only one set of cords.
- Begin by taking the left cord and crossing it over the center cords, creating a loop on the right side.
- Then, take the right cord, cross it over the left cord, and thread it through the loop on the right side.
- Repeat the process, starting with the right cord crossing over the center cords and creating a loop on the left side.
- Tighten the knot by pulling both cords firmly.
Lark’s head knot:
- The lark’s head knot is often used to attach cords to a ring or dowel, creating a secure base for your macrame project.
- Start by folding a cord in half to form a loop and place it under the ring or dowel.
- Bring the cord ends over the ring or dowel and through the loop created.
- Pull the cord ends to tighten the knot securely around the ring or dowel.
Demonstrating Step-By-Step Instructions For Each Knot With Detailed Diagrams And Tips
Now that we understand the basics of each macrame knot, let’s go through step-by-step instructions for creating these knots.
Detailed diagrams and tips will help you visualize the process and ensure successful knotting. Follow these guidelines to create beautiful macrame water bottle holders:
Square knot:
- Step 1: Take two sets of cords, crossing them as described earlier.
- Step 2: Repeat the knotting process, alternating the cord order.
- Step 3: Continue knotting until you reach the desired length for your water bottle holder.
- Tip: Keep the tension even throughout the knotting process to maintain a consistent pattern.
Half square knot:
- Step 1: Start with one set of cords, following the instructions mentioned above.
- Step 2: Repeat the knotting process, always starting with the same cord.
- Step 3: Create a pattern by alternating the starting cord with each knot.
- Tip: Experiment with different color combinations or cord thicknesses for added visual interest.
Lark’s head knot:
- Step 1: Fold a cord in half to create a loop, placing it under the ring or dowel.
- Step 2: Pull the cord ends over the ring or dowel and through the loop.
- Step 3: Secure the knot tightly by pulling the cord ends.
- Tip: Use multiple lark’s head knots to attach multiple cords to the ring or dowel for a fuller design.
Exploring Variations And Decorative Elements To Add Uniqueness To The Design
Once you have mastered the basic macrame knots, it’s time to get creative and add unique touches to your water bottle holder.
Here are some variations and decorative elements you can experiment with:
- Beads: Incorporate beads into your design by threading them onto the cords before knotting.
- Fringe: Add fringe to the bottom of the water bottle holder by unraveling the cords or attaching separate strands.
- Embellishments: Attach charms, feathers, or small decorative items to give your water bottle holder a personal touch.
- Dyeing: Consider dyeing your cords to create a gradient or ombré effect for a visually striking design.
- Macrame patterns: Explore different macrame patterns, such as chevron or diamond, to add complexity to your water bottle holder.
Remember, the possibilities are endless when it comes to macrame. Use your imagination and create a water bottle holder that reflects your personal style and creativity. Happy knotting!
Assembling The Water Bottle Holder
Attaching The Macrame Knots To The Metal Ring For Stability
When it comes to assembling the macrame water bottle holder, attaching the knots to a metal ring provides stability and ensures your holder will hold up over time.
Here are the key points to keep in mind:
- Begin by folding the macrame cord in half and placing the folded end through the metal ring, creating a loop.
- Take the loose ends of the cord and pull them through the loop, creating a lark’s head knot around the ring.
- Repeat this step with additional cords, spacing them evenly around the ring. The number of cords you’ll need will depend on the desired thickness of your holder.
- To ensure a secure attachment, tighten each knot by pulling on the cords individually. This will help prevent your water bottle holder from coming loose or slipping.
Incorporating Wooden Beads For Added Aesthetics And Functionality
To enhance the aesthetics and functionality of your macrame water bottle holder, incorporating wooden beads can add a decorative touch and provide additional support.
Consider the following tips:
- Thread a wooden bead onto each individual cord before attaching it to the metal ring. This will create a visually appealing design element.
- The wooden beads not only add beauty but also serve a purpose. They help to distribute the weight of the water bottle evenly, reducing strain on the cords and increasing the strength of the holder.
- Experiment with different bead sizes and colors to customize your water bottle holder to your personal style.
Testing The Strength And Adjusting The Length Of The Holder
Before you finalize your macrame water bottle holder, it’s crucial to test its strength and adjust the length as needed.
Follow these steps for optimal functionality:
- Carefully hang the holder from a sturdy hook or doorknob, ensuring it is secure.
- Place a filled water bottle into the holder, checking for any signs of strain or weakness in the knots or cords. Make any necessary adjustments to reinforce the knots.
- Adjust the length of the holder by either adding or removing cords. Remember to maintain an even distribution of cords around the metal ring.
- Test the strength and balance of the holder again after making any adjustments.
- By testing and adjusting the holder, you can ensure that it will securely hold your water bottle without any issues.
Remember, the assembly process is a crucial stage in creating your diy macrame water bottle holder.
By attaching the knots to the metal ring, incorporating wooden beads for aesthetics and functionality, and testing the strength and adjusting the length, you’ll have a reliable and stylish holder for your water bottle.
Get ready to show off your macrame skills while staying hydrated in style!
Final Touches And Customizations
Adding the final touches to your macrame water bottle holder allows you to put your personal stamp on this diy project.
Here are a few ideas to consider when customizing your creation:
Trimming Excess Cord For A Neat Appearance
To achieve a clean and polished look, it’s important to trim any excess cord from your macrame water bottle holder.
Follow these steps for a neat finish:
- Gently comb through the cords with your fingers to separate them.
- Use sharp scissors to carefully trim any loose or uneven ends.
- Take your time and trim small sections at a time to ensure precision.
Adding Additional Embellishments Like Feathers Or Tassels
If you want to take your macrame water bottle holder to the next level, consider adding some additional embellishments.
Here are a few ideas to inspire you:
- Attach small feathers to the bottom of the holder for a bohemian touch.
- Add tassels to the bottom cords for added flair and movement.
- Incorporate beads or charms into the design for a personalized touch.
Experimenting With Different Color Combinations And Patterns
One of the most exciting parts of creating a macrame water bottle holder is the opportunity to play with different colors and patterns.
Here are a few tips to consider when experimenting:
- Mix and match various colors of cord to create a vibrant and eye-catching design.
- Try using different thicknesses of cord for added texture and visual interest.
- Explore various knotting techniques to create unique patterns and designs.
Remember, the beauty of diy projects is that you have the freedom to customize to your heart’s content.
Let your creativity shine and have fun with these final touches and customizations for your macrame water bottle holder.
Now that you have all the knowledge and tips you need, it’s time to get started on creating your very own macrame water bottle holder.
Enjoy the process and revel in the satisfaction of a project well-done. Cheers to staying hydrated in style!
Can I Use the DIY Hot Water Bottle Cover Steps for Making a Macrame Water Bottle Holder?
Can I Use the DIY Hot Water Bottle Cover Steps for Making a Macrame Water Bottle Holder? Unfortunately, the easy hot water bottle cover tutorial cannot be directly used for creating a macrame water bottle holder. While both involve crafting items for bottles, the techniques, materials, and designs differ significantly. However, you can still find plenty of online tutorials for making macrame water bottle holders to satisfy your creativity.
FAQ About Macrame Water Bottle Holder Diy
How Do You Make A Macrame Water Bottle Holder?
To make a macrame water bottle holder, you will need some macrame cord, scissors, and basic knotting skills. Follow these step-by-step instructions to create your own stylish holder.
What Kind Of Cord Is Best For Macrame Water Bottle Holders?
When making a macrame water bottle holder, it is recommended to use a sturdy and durable cord, such as cotton or nylon, as it can hold the weight of the bottle securely.
Can I Customize The Design Of My Macrame Water Bottle Holder?
Absolutely! Macrame allows for endless customization options. You can experiment with different knots, colors, and patterns to create a unique and personalized water bottle holder that matches your style.
Are Macrame Water Bottle Holders Suitable For Outdoor Activities?
Yes, macrame water bottle holders are not only stylish but also practical for outdoor activities. They keep your hands free and your water bottle easily accessible, making them perfect for hiking, biking, or any adventure.
Can I Use Macrame Water Bottle Holders For Other Purposes?
Definitely! Macrame water bottle holders can also be used to hold other items like mason jars, vases, or even small plants. Get creative and repurpose your holder for various needs.
Conclusion
To sum it up, creating your own macrame water bottle holder is not only a fun and crafty project, but it also brings practicality and style to your daily life.
By following the step-by-step instructions in this diy guide, you can easily customize your water bottle holder to match your personal taste and preferences.
Not only does macrame offer an aesthetically pleasing design, but it also provides a sturdy and reliable way to carry your water bottle on the go.
Whether you are an experienced macrame artist or a beginner looking to try something new, this diy project is suitable for all skill levels.
So grab your materials, get creative, and enjoy the satisfaction of making a handmade macrame water bottle holder that perfectly fits your needs and adds a touch of boho chic to your everyday adventures.