How to Make Light With Water Bottle? 9 Easy Steps
To make light with a water bottle, fill a clear plastic bottle with clean water, add bleach to the water to prevent algal growth, and then install it on a rooftop with half of it outside and half of it inside the room.
The bottle refracts sunlight into the room, providing a natural source of light.
This process works because water is an excellent refractor of light, where it can bend sunlight and disperse it in multiple directions.
The bleach added to the water prevents algae and other micro-organisms from forming in the water.
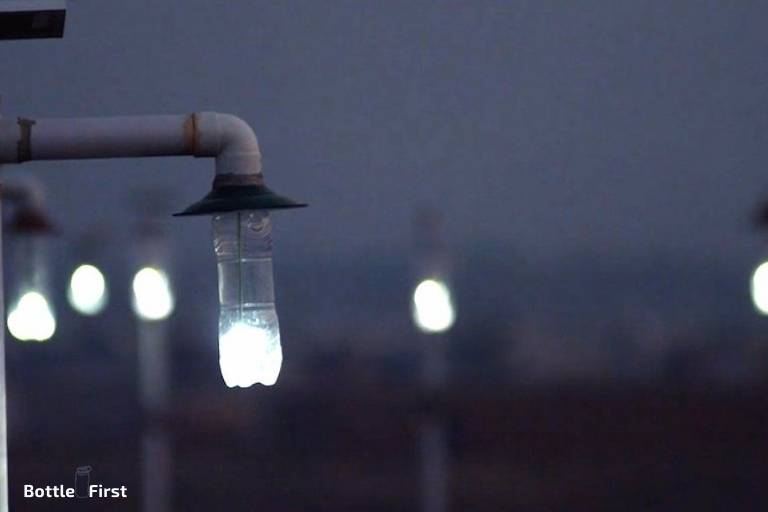
When the bottle is installed half-way through the roof, the upper half that is exposed outside captures sunlight, refracts it through the water, and the lower half that is inside the room disperses the light, illuminating the room naturally.
Making light with a water bottle is a simple and ingenious solution that is particularly useful in underprivileged areas where electricity may not be readily available.
The water bottle light not only reduces the cost of lighting but also decreases the reliance on non-renewable sources of energy.
It is a perfect example of how simple scientific principles can bring about significant societal benefits.
9 Steps To Make Light With a Water Bottle
| Step | Instruction |
|---|---|
| 1 | Gather all necessary materials. This typically includes a 1-2L clear water bottle, water, and bleach. |
| 2 | Fill the bottle to the brim with clean water. |
| 3 | Add a few drops of bleach to the water. This is to prevent the water from growing algae and turning green. |
| 4 | Securely cap the bottle. |
| 5 | Choose your installation location. It should be a place where sunlight can directly reach the bottle. |
| 6 | Cut a hole in the chosen installation area about the circumference of the bottom of the bottle. |
| 7 | Insert the bottle into the hole from above, leaving the top exposed to the sunlight. |
| 8 | Seal the area around the bottle with water-resistant sealant to prevent leakage. |
| 9 | The bottle will refract the sunlight into the room, providing a light source during daylight hours. |
Key Takeaway
Five Interesting Facts About Making Light With a Water Bottle
Materials Needed
Gathering The Necessary Supplies For The Project
Are you looking to add some creative lighting to your space? Look no further than this simple diy project that shows you how to make light with a water bottle.
Gather the materials listed below to get started on this fun and eco-friendly project.
- Water bottle: Choose a plastic water bottle of any size and shape. An empty and clean bottle is all you need to create a dazzling light fixture.
- Led fairy lights: These small and energy-efficient lights are perfect for creating a warm and magical glow. Opt for battery-operated lights for convenience.
- Scissors: Make sure to have a pair of sharp scissors on hand to help with cutting the bottle.
- Adhesive tape: Use strong adhesive tape to secure the lights to the bottle. This will ensure they stay in place and create the desired effect.
- Marker: A marker will be handy for marking where you need to make your cuts on the water bottle.
- Optional: Decorative materials such as stickers, glitter, or paint can be used to personalize your light fixture and give it a unique touch.
Now that you have gathered all the necessary supplies, you are ready to embark on this exciting diy project. Gather your creativity and let’s bring some enchanting light into your space with just a water bottle!
Assembly Process
Preparing The Water Bottle For Transformation
Before you can turn a regular water bottle into a light source, there are a few steps you need to follow to ensure its successful transformation.
Here’s a step-by-step guide on how to prepare the water bottle:
- Gather the necessary materials: You will need a clean and empty plastic water bottle, a small led light or flashlight, scissors, and tape.
- Remove the label: Start by peeling off any labels or stickers from the water bottle. Make sure the surface is clean and free from any residue.
- Rinse the bottle: Give the water bottle a thorough rinse to ensure it’s free from any impurities or debris. This will help to maximize the clarity of the light emitted.
- Cut off the bottom: Using your scissors, carefully cut off the bottom of the water bottle. This will serve as the opening for the light source.
- Optional: Create a handle (if desired): if you want to hang or carry your light source, you can cut a small hole near the top of the bottle and thread a string or wire through it to create a handle.
- Smooth the edges: To prevent any sharp or jagged edges, use sandpaper or a file to smooth out the cut edges of the bottle.
- Clean and dry the bottle: Before proceeding to the next step, ensure that the bottle is completely dry and free from any moisture.
Now that you have successfully prepared the water bottle, you are ready to move on to the exciting part: creating the light source.
Let’s dive into the step-by-step instructions for this process.
Testing And Troubleshooting
Ensuring The Functionality Of The Diy Light
If you’ve successfully created a light using a water bottle, it’s important to test and troubleshoot to ensure its proper functionality.
Here are some key points to keep in mind:
- Check the connections: Make sure all electrical connections are securely fastened. Loose connections can lead to a malfunctioning light.
- Inspect the water bottle: Ensure that the water bottle is intact and free from any cracks or damage. Any leaks or structural issues can affect the performance of the light.
- Verify the power source: Confirm that the power source, such as batteries or a solar panel, is fully charged and functioning correctly. Inspect the connection points to ensure there are no loose or corroded wires.
- Test the switch: Check the functionality of the switch to ensure it turns the light on and off smoothly. If the switch is faulty, it may need to be replaced.
- Evaluate the brightness: Test the light to see if it produces the desired level of brightness. Check if the intensity of the light can be adjusted according to your preferences.
Addressing Potential Issues And How To Fix Them
While creating a diy light with a water bottle is a creative and eco-friendly solution, it’s not uncommon to face some challenges along the way.
Here are a few potential issues that may arise and suggestions on how to fix them:
- Dim or flickering light: If your light appears dim or flickers, check the batteries or power source to ensure they have enough power. Replace them if necessary. Additionally, ensure that all connections are secure and free from corrosion.
- Overheating: If the light generates excessive heat, it could be a sign of a wiring issue or inadequate ventilation. Double-check the connections and modify the design if necessary. Consider adding ventilation holes to dissipate heat effectively.
- Water leakage: In case there is water leakage from the water bottle, inspect the bottle for cracks or damage. Replace the bottle if needed, ensuring that the new one is sealed tightly to prevent any leakage.
- Unresponsive switch: If the switch fails to turn the light on or off, check the wiring connections behind the switch. Also, test the switch with a multimeter to ensure it is functioning correctly. Replace the switch if it is faulty.
- Inconsistent brightness: If the light’s brightness varies or is irregular, check the wiring connections between the power source and the lightbulb. Make sure there are no loose wires or weak connections interrupting the flow of electricity.
Remember, troubleshooting is part of the diy process. It’s always better to take the time to identify and fix any issues to ensure your water bottle light works safely and efficiently.
FAQ About How To Make Light With Water Bottle
How Can I Make Light With A Water Bottle?
To make light with a water bottle, fill it with water and place a flashlight against the side so the light refracts through the water, creating a glowing effect.
What Materials Do I Need To Make Light With A Water Bottle?
All you need is a clear plastic water bottle, water, and a flashlight to create light using a water bottle.
Does The Size Of The Water Bottle Matter?
The size of the water bottle doesn’t matter, as long as it’s clear and made of plastic. The effect works with various bottle sizes.
Can I Use Any Type Of Flashlight?
Yes, any type of flashlight can be used as long as it fits against the side of the water bottle.
Are There Any Safety Precautions To Consider?
It’s important to ensure the water bottle doesn’t leak and that the flashlight is secured tightly to avoid any accidents or electrical hazards.
Conclusion
To sum up, creating a light with a water bottle is a simple yet effective way to illuminate your surroundings.
By following the steps outlined in this blog post, you can easily transform a regular water bottle into a practical light source.
This diy project not only promotes eco-friendliness by reusing materials, but it also provides a cost-effective alternative to traditional lighting solutions.
Whether you’re camping in the great outdoors or experiencing a power outage at home, this technique can come in handy.
Remember to gather all the necessary supplies, such as a water bottle, bleach, and a reliable light source, to ensure optimal results.
With a little effort and creativity, you can harness the power of water to produce light, demonstrating the endless possibilities that exist for sustainable and innovative solutions.
Empower yourself by embracing this simple yet impactful diy project today.